
Application Note


FS; Reviewed:
SPOC 06/8/2011
Solution & Interoperability Test Lab Application Notes
©2011 Avaya Inc. All Rights Reserved.
11 of 37
B179-CS1KR75
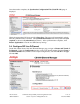
Once the transfer completes, the Synchronize Configuration Files (Node ID <id>) page is
displayed.
Check the appropriate Call Server and click Start Sync. The screen will automatically refresh
until the synchronization is finished. The Synchronization Status field will update from Sync
required (as shown) to Synchronized (not shown). After synchronization completes, click
Restart Applications to use the new SIP Gateway settings.
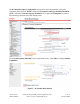
3.4. Configure SIP Line D-Channel
On the left column menu of the main Element Manager page, navigate to Routes and Trunks
D-Channels. Under the Configuration section, select a D-Channel number from the Choose a
D-Channel Number list (channel 3 in the sample configuration), and select DCH for the type.
Click to Add.