Avaya B179 Conference Phone with Avaya Communication Server 2100 (CS 2100) version SE13 Issue 2.0 Abstract These Application Notes present a sample configuration that enables the B179 Conference Phone (version 2.2.1) to register as a client with the Avaya Communication Server 2100 (version SE13). 09/27/2011 CS 2100 Interoperability Lab Application Notes ©2011 Avaya Inc. All Rights Reserved. 1 of 8 B179CS2100SE13.
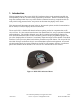
1. Introduction With the introduction of the Avaya B179 SIP Conference phone to the terminals portfolio the interoperability with the CS 2100 is being requested by customers. With this terminal having a long term roadmap within the Avaya Aura solution custoemrs know they can purchase this set today with it being protected in the Avaya Aura environment they deploy in the future.
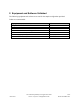
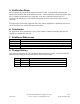
2. Equipment and Software Validated The following equipment and software were used for the sample configuration provided: Tables are recommended: Equipment Avaya B179 SIP Conference Phone CS 2100 Session Server Line (aka A2E) Centrex IP Client Manager 1100 IP Phone (SIP) Polycom SoundStation 1230 IP Phone (Unistim) 09/27/2011 Software 2.2.1 SE13 12.0.6.0 11mr2 4.1.0.15.0 3.3.0 062AC8G CS 2100 Interoperability Lab Application Notes ©2011 Avaya Inc. All Rights Reserved. 3 of 8 B179CS2100SE13.
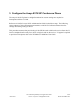
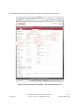
3. Configure the Avaya B179 SIP Conference Phone The setup of the B179 phone is straightforward and no custom settings are required to interoperate with the CS 2100. Reference 16-603915 Avaya B179 Administration Guide for details on setup. The following screen captures of the web management interface on the B179 Conference Phone show the settings used during testing of the set.
The following diagram shows the fields to register the phone with the call server. Figure 2: B179 SIP Conference Phone – SIP Configuration screen 09/27/2011 CS 2100 Interoperability Lab Application Notes ©2011 Avaya Inc. All Rights Reserved. 5 of 8 B179CS2100SE13.
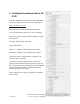
4. Configure terminal profile in CS 2100 Enter the management console of the SSL application on the CS 2100 by using web browser and going to: http://:12120 Click the link for the MCP Management Console Java will launch and connect to the server and login.
5. Verification Steps Once completed the phone should register with the CS 2100. This should be verified by the square status identifier next to the lab on the screen. If the terminal has successfully register with the CS 2100 this should show up as fully dark. If the box is outlined, then the user isn’t registered with the call server and further investigation as to the reason for the failure may be necessary.
©2011 Avaya Inc. All Rights Reserved. Avaya and the Avaya Logo are trademarks of Avaya Inc. All trademarks identified by ® and ™ are registered trademarks or trademarks, respectively, of Avaya Inc. All other trademarks are the property of their respective owners. The information provided in these Application Notes is subject to change without notice.