ERX-H61 Micro ATX Montherboard with Intel® H61 Express Chipset User’s Manual 3rd Ed – 20 January 2015 Copyright Notice Copyright 2015 Avalue Technology Inc., ALL RIGHTS RESERVED. Part No.
ERX-H61 Use’s Manual Content 1. Getting Started ............................................................................................................ 3 1.1 Safety Precautions.................................................................................................. 3 1.2 Packing List ............................................................................................................ 3 1.3 Specifications .................................................................................
ERX-H61 User’s Manual 1. Getting Started 1.1 Safety Precautions Warning! Always completely disconnect the power cord from your chassis whenever you work with the hardware. Do not make connections while the power is on. Sensitive electronic components can be damaged by sudden power surges. Only experienced electronics personnel should open the PC chassis. Caution! Always ground yourself to remove any static charge before touching the CPU card.
ERX-H61 Use’s Manual 1.
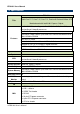
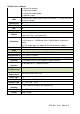
ERX-H61 User’s Manual 2 x System fan headers 1 x Front panel header 1 x Front panel audio header 1 x Speaker header USB 8 x USB 2.0 (4 x USB 2.0 Ports ,rear I/O connectors , 4 x USB 2.0 Ports , internal pin-header) Parallel Port NA PS2 1 x PS2 K/B, 1 x PS2 Mouse KB/MS DIO NA Display Chipset Resolution Dual Display Intel® HD Graphics Media Accelerator 2000/3000 (Based on CPU type) Support for DX10.1 and OpenGL3.
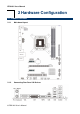
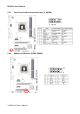
ERX-H61 Use’s Manual 2 Hardware Configuration 2.1 Product Overview 2.1.1 Main board layout 2.1.
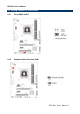
ERX-H61 User’s Manual 2.2 Setting Jumpers & Connectors 2.2.1 Clear CMOS (JBAT) 2.2.
ERX-H61 Use’s Manual 2.2.3 FAN power connectors (CFAN or CFAN1) 2.2.
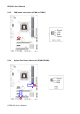
ERX-H61 User’s Manual 2.2.5 Front Panel Switches (FPANEL1) HD_LED (Red): Hard Drive LED connector RST (Blue): Reset button PWR_ON (Black): Power button PWR_LED (Green): Power/Standby LED 2.2.6 Speaker Headers (SPEAK1) This 4-pin connector connects to the PC buzzer speaker. Speaker (Yellow or Black) Pin No.
ERX-H61 Use’s Manual 2.2.7 Front Panel Audio Connection Header (F_AUDIO) 2.2.
ERX-H61 User’s Manual 2.2.9 JDVI_HDMI and JME connectors (JDVI_HDMI / JME) Shorten #pin 1-2 to DVI device. If can't be detected, please shorten #pin 2-3 to HDMI.
ERX-H61 Use’s Manual 2.2.10 S/PDIF Output connector (Optional) 2.2.
ERX-H61 User’s Manual 2.2.12 Power connector (PWR12V) 2.2.
ERX-H61 Use’s Manual 3. BIOS Setup Note: Installation procedures and screen shots in this section are for your reference and may not be exactly the same as shown on your screen.
ERX-H61 User’s Manual 3.1 Starting Setup The BIOS is immediately activated when you first power on the computer. The BIOS reads the system information contained in the NVRAM and begins the process of checking out the system and configuring it. When it finishes, the BIOS will seek an operating system on one of the disks and then launch and turn control over to the operating system.
ERX-H61 Use’s Manual 3.2 Using Setup Press F1 to pop up a small help window that describes the appropriate keys to use and the possible selections for the highlighted item. Please check the following table for the function description of each control key.
ERX-H61 User’s Manual 3.4 In Case of Problems If, after making and saving system changes with Setup, you discover that your computer no longer is able to boot, the BIOS support an override to the NVRAM settings which resets your system to its defaults. The best advice is to only alter settings which you thoroughly understand. To this end, we strongly recommend that you avoid making any changes to the chipset defaults.
ERX-H61 Use’s Manual • BIOS Information This Item mainly introduce the BIOS related information, such as the BIOS version, the BIOS manufacturer, the program code versions, establish dates, memory capacity and frequency, choose the BIOS use of language, the setting of the system date and time, access BIOS user level, etc. • Memory Information Displays the auto-detected system memory. • System Date This item sets the date you specify(usually the current date0in the format of [Month],[Date], and [Year].
ERX-H61 User’s Manual ► ACPI Settings Click key to enter its submenu. • Enable ACPI Auto Configuration Setting the advanced power management configuration, optional for Enalbed, Disbaled. • Enable Hibernation Enables or disables system ability to hibernate (OS/S4 sleep state). This option may be not effective with some OS. Optional for Enalbed, Disbaled. • ACPI Sleep State Select the highest ACPI sleep state the system will enter when the suspend button is pressed.
ERX-H61 Use’s Manual ► RTC Wake Settings Click key to enter its submenu. • Wake System With Fixed Time Enable or Disabe System wake on alarm event. When enabled,System will wake on the Hr::min::sec specified. • Wake system with Dynamic Time Enable or disable system wake on alarm event. When enabled, system will wake on the current time + Increase minute(s). ・Press key to return to "Advanced" menu.
ERX-H61 User’s Manual ► CPU Configuration Click key to enter its submenu. This is CPU configuration options, and show processor working states, such as frequency,64-bit support, maximum/min frequency, stepping, microcode version, code number and hyper-threading technology support, etc. • Max Freq Ratio This sets the maximum ratio. • Set Boot Freq Ratio This sets the boot ratio. • Hyper-threading Setting hyper-threading technology open or closed.
ERX-H61 Use’s Manual •Execute Disble Bit This item appears only for certain processors with the Execute Disable Bit (XD bit) feature. When set to [Enabled], this item allows the processor to prevent data pages from being used by malicious software to execute code and provide memory protection. •Hardware Prefetcher To turn on/off the Mid Level Cache (L2) streamer prefetcher. •Adjacent Cache Line Prefetch Setting to turn of/off prefectching of adjcent cache lines.
ERX-H61 User’s Manual • Legacy USB Support Setting support old input/output devices, such as the mouse, keyboard etc. • EHCI Hand-off Setting EHCI Hand-Off function. • Port 60/64 Emulation The item is to increase the USB KBC compatibility. • USB transfer time-out The time-out value for CONTROL, Bulk, and Interrupt transfers. • Device reset time-out USB mass storage device Start Unit command time-out.
ERX-H61 Use’s Manual • AC Power Loss Setting the system state choice after powre failure. Setting "Power Off", need to press case panel on the Power switch to boot. Setting "Power On", the supply reply directly boot. Setting "Last State", Power reply recovery system State before power off. The default value as "Power Off". ・Press key to return to "Advanced" menu.
ERX-H61 User’s Manual 3.5.3 Chipset Setting ►North Bridge Click key to enter its submenu • Low MMIO Align Low MMIIO resources align at 64MB/1024MB. • DMI Gen2 DMI Gen2 Enabled/Disabled. • VT-d Available options: Enabled, Disabled • Initate Graphic Adapter Select which graphics controller to use as the primary boot device.
ERX-H61 Use’s Manual IGD share memory size. • Render Standby Enable/Disable Render Standby by Internal Graphics Device. • IGD Multi-Monitor Enable/Disable IGD Multi-Monitor by Internal Graphics Device. ・Press key to return to "Chipset" menu. ► SB Devices Control Click key to enter its submenu. • Onboard LAN Controller This option allows you whether enable the onboard LAN. • Azalia HD Audio Sets the HD Audio has Enabled or Disabled state.
ERX-H61 User’s Manual • SATA Mode This item allows users to enable or disable the SATA controller. • Serial-ATA Controller 0 Available options: Disabled,Enhanced,Compatible • Serial-ATA Controller 1 Available options: Disabled,Enhanced,Compatible • SATA Port 1 /2/3/4 Display SATA devices. ・Press key to return to "Chipset" menu. ► Intel IGD OpRegion Click key to enter its submenu. • DVMT Mode Select Select DVMT Mode used by Internal Graphics Device.
ERX-H61 Use’s Manual ► ME Subsystem Click key to enter its submenu. • ME Subsystem Available options: Disabled,Enabled • ME Temporary Disable Available options: Disabled,Enabled • End of Post Message Available options: Disabled,Enabled ► ME Subsystem Click key to enter its submenu.
ERX-H61 User’s Manual ► Serial Port 0 Configuration Click key to enter its submenu. • Serial Port Enable or Disable Serial Port (COM). • Change Settings Select an optimal setting for Super IO device. 3.5.4 Boot Setting • Setup Prompt Timeout Number of seconds to wait for setup activation key. • Bootup NumLock State Allows you to select the power-on state for the NumLock. • Full Screen Logo This item determines to show the full screen logo when booting.
ERX-H61 Use’s Manual • Interrupt 19 Capture When set to Enabled, this function allows the option ROMs to trap Interrupt 19. • Boot Option #1 Sets the system boot order. ► Hard Drive BBS Priorities Click key to enter its submenu, it will be display specifies the boot sequence from the available devices. 3.5.5 Security Setting • Administrator Password This option is used to set an administrator password, as the following steps: 1. Move the cursor to the Administrator Password item, press . 2.
ERX-H61 User’s Manual computer case and clear all information in the NVRAM before you can start up the system. But by doing this, you will have to reset all previously set options. 3.5.6 OverClock Setting ► CPU Configuration Click key to enter its submenu.The following items: setting CPU Multiplier, CPU power consumption limit, power consumption limit, overclocking switch.
ERX-H61 Use’s Manual ► Memory Configuration Click key to enter its submenu.The following items: Setting FSB and memory parameters act. ► Graphics Configuration Click key to enter its submenu. The following items: setting graphics core ratio limit, graphics voltage, iGFX core current max.
ERX-H61 User’s Manual ► OC Voltage Control Click key to enter its submenu. The following items: Setting the memory voltage. 3.5.7 Save & Exit Setting • Save Changes and Exit Select "Save Changes and Exit", and press the Enter key, and select "Yes" button, so save all settings the results to the NVRAM and exit BIOS setup program. If not stored, then select "No" or Press "ESC" key and return to the "Save & Exit" menu.
ERX-H61 Use’s Manual changes made to the BIOS and restart. Select "No" or press "ESC" and return to the main menu. • Discard Changes and Reset Select "Discard Changes and Reset", select "Yes" and press to give up to save the BIOS changes and restart. Select "No" or press "ESC" and return to the main menu. • Save Changes Select "Save Changes", select "Yes" and press to save the BIOS changes. Select "No" or press "ESC" key and return to the main menu.
ERX-H61 User’s Manual 4. Drivers Installation Note: Installation procedures and screen shots in this section are for your reference and may not be exactly the same as shown on your screen.
ERX-H61 Use’s Manual 4.1 Install Chipset Driver (For Intel H61 Express) Insert the Supporting DVD-ROM to DVD-ROM drive, and it should show the index page of Avalue’s products automatically. If not, locate Index.htm and choose the product from the menu left, or link to \Driver_Chipset\Intel. Note: The installation procedures and screen shots in this section are based on Windows XP operation system. If the warning message appears while the installation process, click Continue to go on. Step1.
ERX-H61 User’s Manual 4.2 Install Display Driver (For Intel H61 Express) Insert the Supporting DVD-ROM to DVD-ROM drive, and it should show the index page of Avalue’s products automatically. If not, locate Index.htm and choose the product from the menu left, or link to \VGA\H6s. Note: The installation procedures and screen shots in this section are based on Windows XP operation system. Step 1. Locate 「Driver\VGA\H6s\win_xp \setup.exe」. Step 2. Click Next. Step 3. Click Next. Step 4. Click Yes.
ERX-H61 Use’s Manual 4.3 Install Audio Driver (For Realtek) Insert the Supporting DVD-ROM to DVD-ROM drive, and it should show the index page of Avalue’s products automatically. If not, locate Index.htm and choose the product from the menu left, or link to \Driver_Audio\Realtek HD. Note: The installation procedures and screen shots in this section are based on Windows XP operation system. Step 1. Locate 「\Driver\Audio\Realtek HD\XP\setup.exe」. Step 2. The program executes the Setup automatically.
ERX-H61 User’s Manual 4.4 Install Ethernet Driver (For Realtek PCIE) Insert the Supporting CD-ROM to CD-ROM drive, and it should show the index page of Avalue’s products automatically. If not, locate Index.htm and choose the product from the menu left, or link to \Driver_Network\Realtek PCIE. Note: The installation procedures and screen shots in this section are based on Windows XP operation system. Step 3. Click Finish to complete the setup. Step 1. Locate 「\Driver\LAN\Realtek PCIE\XP\setup.exe」.