Avalue Intelligent Display & Systems AID-173S All-In-One Bedside Terminals Quick Reference Guide 1st Ed- 15 October 2010 Copyright © 2010 Avalue Technology Inc., All Rights Reserved .
AID-173S Quick Reference Guide Federal Communication Commission Interference Statement THIS DEVICE COMPLIES WITH PART 15 OF THE FCC RULES. OPERATION IS SUBJECT TO THE FOLLOWING TWO CONDITIONS: (1) THIS DEVICE MAY NOT CAUSE HARMFUL INTERFERENCE AND (2) THIS DEVICE MUST ACCEPT ANY INTERFERENCE RECEIVED, INCLUDING INTERFERENCE THAT MAY CAUSE UNDESIRED OPERATION. Note: This equipment has been tested and found to comply with the limits for a Class B digital device, pursuant to Part 15 of FCC Rules.
AID-173S Quick Reference Guide FCC RF Radiation Exposure Statement This equipment complies with FCC radiation exposure limits set forth for an uncontrolled environment. This equipment should be installed and operated with minimum distance 20cm between the radiator & your body. For product available in the USA/Canada market, only channel 1~11 can be operated. Selection of other channels is not possible.
AID-173S Quick Reference Guide CONTENT 1. AID-173S Bedside Terminals Features ...........................................................5 1.1 Front Look .........................................................................................6 1.2 Rear & Bottom Look .........................................................................7 1.3 Handset..............................................................................................8 2. Setting Up AID-173S Bedside Terminals.....................
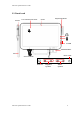
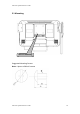
AID-173S Quick Reference Guide 1. AID-173S Bedside Terminals Features ▬▬▬▬▬▬▬▬▬▬▬▬▬▬▬▬▬▬▬▬▬▬▬▬▬▬▬▬▬▬▬▬▬▬ In this chapter, you will learn all of the features of AID-173S bedside terminals. 1.1 Front Look 1.2 Rear & Bottom Look 1.
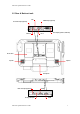
AID-173S Quick Reference Guide 1.1 Front Look Magnetic Strip Reader 17.
AID-173S Quick Reference Guide 1.
AID-173S Quick Reference Guide 1.3 Handset Barcode Scanner Volume Scan button Key Descriptions Activate the phone software (i.e.
AID-173S Quick Reference Guide 2. Setting Up AID-173S Bedside Terminals ▬▬▬▬▬▬▬▬▬▬▬▬▬▬▬▬▬▬▬▬▬▬▬▬▬▬▬▬▬▬▬▬▬▬ In this chapter, you will learn how to set up AID-173S bedside terminal hardware and cable connection. Finally, with Internet ISP setting information, you will be able to connect AID-173S bedside terminal to the Internet. 2.1 Mounting 2.2 Cabling 2.3 System Activation & Registration 2.
AID-173S Quick Reference Guide 2.
AID-173S Quick Reference Guide 2.2 Cabling 1. Power Cable 2. Ethernet (RJ-45) Cable (Optional) 3. TV (Coaxial) Cable (Optional) Coaxial connector Ethernet (RJ-45) Connector Power Jack Please follow below steps to connect the power cable and the system.
AID-173S Quick Reference Guide 2.3 System Activation & Registration 1. When you first receive the system, a system activation and software registration might be performed before the use of this system. 2. Please consult your local service providers for more details.
AID-173S Quick Reference Guide 2.4 Connecting to the Internet 1. Use built-in wireless LAN to connect to the Internet. 2. Use Ethernet (RJ-45) to connect to the Internet. 3. Consult your Internet Service Provider (ISP) for software settings. Note: ISP, IP, (wireless) router, Access Point, DSL modem, Access ID & Password, and so on, are needed for Internet access.
AID-173S Quick Reference Guide 3. Using AID-173S Bedside Terminals ▬▬▬▬▬▬▬▬▬▬▬▬▬▬▬▬▬▬▬▬▬▬▬▬▬▬▬▬▬▬▬▬▬▬ In this chapter, you will learn how to use all the features of AID-173S bedside terminal. 3.1 3.2 3.3 3.4 3.5 3.6 3.7 3.
AID-173S Quick Reference Guide 3.1. Turn ON/OFF the System ON/OFF Touch Button 3.1.1 Turn ON the System 1. 2. 3. 4. Check if the led on the Power ON/OFF icon is red. Move your finger on the top of the Power ON/OFF icon. The led on the Power ON/OFF icon turns green. Now the system is turned ON. 3.1.2 Turn OFF the System 1. Move your finger on the top of the Power ON/OFF icon for about 4 seconds. 2. The led on the Power ON/OFF icon turns red. 3. The system is turned OFF.
AID-173S Quick Reference Guide 3.2 Using LCD Display and Touch Screen Control Buttons 3.2.1 Adjust System Volume 1. Move your finger on the top of the Volume Up or Volume Down icon. 2. The volume will be adjusted accordingly. 3.2.2 Adjust LCD Display Brightness 1. Move your finger on the top of the Brightness Up or Brightness Down icon. 2. The brightness of the LCD display will be adjusted accordingly. 3.2.3 Using Touch Screen 1. To select the item on the touch screen, press the item once. 2.
AID-173S Quick Reference Guide 3.3 Using Earphone and Microphone 1. Open the rubber cover on the right side of the system. 2. Insert the earphone phone or microphone into the jacks.
AID-173S Quick Reference Guide 3.4 Using the Smart Card Reader 1. Have the IC card face up. 2. Insert the IC card into the Smart Card Reader slot.
AID-173S Quick Reference Guide 3.5 Using Magnetic Strip Reader 1. Have your card with the magnetic strip facing outside. 2. Slide the card from top to the bottom.
AID-173S Quick Reference Guide 3.6 Using RFID Reader/Writer 1. Attach the card to the RFID Reader/Writer. Keep card close to the reader no greater than 5cm. 2. The RFID will beep if the card is read or written successfully. Note: The RFID Reader/Writer accepts ISO 14443A standard cards ONLY.
AID-173S Quick Reference Guide 3.7 Using Handset Take the Handset 1. When you want to use the handset, lift the handset from the cradle. 2. Replace the handset back to the handset cradle with keypad facing inside.
AID-173S Quick Reference Guide Start and End a Phone Conversation 1. To make a phone call, enter the numbers by press the number on the keypad and press “Dial” icon. 2. To end a phone conversation, press the “Hang Up” icon. 3. Use the volume control to adjust the volume of the handset. Note: Phone application software and Internet connection are required.
AID-173S Quick Reference Guide 3.8 Using Barcode Scanner 1. Take the handset and turn it over. 2. Aim the barcode and maintain an appropriate distance between and barcode and scanner. 3. Press SCAN button. 4. The Barcode Scanner will “Beep” when the barcode is successfully read.
AID-173S Quick Reference Guide 4. Upgrading AID-173S Bedside Terminals ▬▬▬▬▬▬▬▬▬▬▬▬▬▬▬▬▬▬▬▬▬▬▬▬▬▬▬▬▬▬▬▬▬▬ In this chapter, you will learn several peripherals upgrade or replacement. Please perform these steps with care. ▲ WARNING: Turn OFF the system and disconnect the power cable before performing the following tasks. ▲CAUTION: Only a certified service technician is authorized to remove the cover and access the components inside the system. 4.1 Adding/Removing/Replacing Memory 4.
AID-173S Quick Reference Guide 4.1 Adding/Removing/Replacing Memory 1. Remove the two screws from the service door. 2. Open the service door. 1. Push the two latches of the retaining clips away from the memory module. 2. The memory module will pop up at an angle. 3. Lift the memory module from the memory socket. 1. Align the correct location of the key slot on the connector edge. 2. Slide the memory module into the memory socket. 3. Push the memory module down until the retaining clip latches catch. 4.
AID-173S Quick Reference Guide 4.2 Adding/Removing/Replacing TV Tuner 1. Remove the two screws from the service door. 2. Open the service door. 1. Unplug the TV signal cable. 2. 3. Unlock the mini-PCIe socket. Pull the TV module out of the socket. 1. Place the TV module into the mini-PCIe socket. 2. Lock the mini-PCIe socket. 3. Connect the TV signal cable to the TV module. 4. Close the service door. 5. Insert the two screws on the service door.
AID-173S Quick Reference Guide 4.3 Removing and Replacing the Wireless Card 1. Remove the two screws from the service door. 2. Open the service door. 1. Unplug the two antennas from the wireless module. 2. Unlock the mini-PCIe socket. 3. Pull the wireless module out of the socket. 1. Place the wireless module into the mini-PCIe socket. 2. Lock the mini-PCIe socket. 3. Connect the two antenna to the wireless module. 4. Close the service door. 5. Insert the two screws on the service door.
AID-173S Quick Reference Guide 4.4 Adding 3rd Party Mini-PCIe Cards 1. Remove the two screws from the service door. 2. Open the service door. 1. Insert the 3rd party mini-PCIe card into the empty mini-PCIe expansion socket. 2. Lock the mini-PCIe socket. Close the service door and insert two screws.
AID-173S Quick Reference Guide 4.5 Removing and Replacing the Hard Disk Drive 1. Remove the two screws from the service door. 2. Open the service door. 1. Remove the two top screws from the hard bracket from the hard disk cage. 2. Disconnect the power and data cables from the back of the hard disk drive. 3. Lift the top of the hard disk drive bracket and pull the hard disk drive from the cage. Remove the two screws on the bracket from the hard disk.
AID-173S Quick Reference Guide 1. Insert the two screws on the bracket. 2. Place the hard disk drive into the cage. 3. Insert two screws on the bracket and the cage. 4. Connect the power and data cable to the hard disk drive. 5. Close the service door and insert two screws.
AID-173S Quick Reference Guide Thank you for purchasing and using AID-173S Bedside Terminals. We hope you have a joyful experience with our products and services.