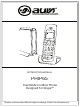
® VISION BEYOND BEYOND SOUND SOUND®® INSTRUCTION MANUAL MANUAL INSTRUCTION PHIP65 PHIP65 Skype™ Cordless phone Dual Mode Cordless Phone Designed For Skype™ Product and subject to to change. Photo is forisreference only. only. Product andInstruction InstructionManual Manual subject change.
Table Of Contents Table Of Contents Caution / Warnings About PHIP65 PHIP65 keys and functions Icons displayed on handset PHIP65 menu structures Main Menu Phone Book Menu Call History Menu Setting Up PHIP65 Setting up handsets and base units Charging the handset Turning handset on and off System requirements Ensuring phone is working properly Step 1: Getting PC ready Step 2: Adjusting the audio setup For Windows® 2000 For Windows® XP Step 3: Connecting PHIP65 to the PC Step 4: Reauthorizing PHIP65 to use Sky
Using the flash feature Making second outgoing calls while on Skype™ Making second outgoing calls while on land line Receiving a second incoming call Chain dialing Hands free calling Using the headset Using speakerphone Adjusting the caller’s voice volume Using the mute function Using the phone book Viewing contacts in a phone book Storing names in a phone book Managing contacts in a phone book Copying entries in a phone book Assigning contacts quick dial numbers Changing quick dial numbers Deleting quick di
Deleting voicemail messages Checking SkypeOut credits Personalizing The PHIP65 Personalizing the phone’s display Adjusting the phone’s contrast Using the auto answer feature Turning the backlight on and off Personalizing the handset sounds Turning the key beep on and off Adjusting handset volume Setting the handset’s time Setting the handset’s alarm Selecting an alarm clock ring melody Setting alarm volume Advanced Features Transferring Skype calls from the PC to the handset Using advanced flash features Usi
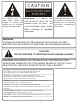
C A U T IO N R IS K OF E L E C TR IC S HOC K DO NOT OP E N The flash and The Lightning lightning flash arrow head within the and arrow head triangle is a warning sign within the triangle is a alerting you of ”dangerous warning sign alerting voltage” inside the product. you of "dangerous voltage" inside the product. WARNING: WARNING: To To r reduce educe t the he risk of of eelectric lectric shock, o not risk shock, ddo not remove cover ( or back). N o remove cover (or back).
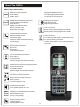
About The PHIP65 PHIP65 keys and functions: MENU MUTE REDIAL Menu & OK key functions: Enter menus. Select menu. Keypad Backlight functions: On while paging the handset. On during an incoming call. Redial, Mute & Back key functions: Switch between call details. Enter dial list. Redial last dialed number. Mute / unmute a call. Delete text and digits. Paging key functions: Page the handset. Register the handset. IN USE Talk & Flash key functions: Make and receive calls. Send flash signal.
Icons displayed on handset: Base / Handset link CID / New missed call PSTN call in progress Message waiting indicator S Battery full; 2/3 full; 1/3 full; Empty Skype call in progress Loudspeaker on Digits / Characters on the right Alarm clock on Up Ringer off Down OK / Confirmation of speakers Back / Erase digits on the left PHIP65 menu structures: The PHIP65 offers a variety of functions and features that are grouped within these menus.
Call History Menu: Missed To Private To Shared Delete Delete All Dialed To Private To Shared Delete Delete All Received To Private To Shared Delete Delete All In the menu mode, press Off / Exit anytime or place the phone on the charger to exit the menu and return to standby. Any unconfirmed changes will not be saved. Setting Up The PHIP65 Setting up handsets and base units: 1. Connect the included power adapter to the power port of the base station. Then plug the power adapter into an electrical outlet.
Charging the handset: An empty battery icon indicates the batteries need to be recharged. Place the handset on the charger to recharge the batteries. A handset reaching a very low battery voltage level will go into sleep mode, displaying LOW BATT on the LCD screen. Get into the habit of putting the handset on the charger to charge when the handset is not being used. This will ensure the handset is always fully charged.
Step 2: Adjusting the audio setup In order to make sure the original audio settings have not been affected, please follow the steps below. For Windows® 2000: 1. With the base turned on and the USB plug inserted into a USB port, click START and select CONTROL PANEL. 2. Click on SOUND AND MULTIMEDIA. 3. Select the AUDIO tab from Sound and Multimedia Properties. 4. Check to see if the current PC speakers are selected in both the SOUND PLAYBACK and the SOUND RECORDING pull down boxes. 5.
Step 4: Reauthorizing PHIP65 to use Skype If you need to reauthorize the driver to access Skype, or if you accidentally blocked access to Skype, follow these steps: 1. In the Skype program, select TOOLS, then click on OPTIONS. 2. Click on the PRIVACY tab. 3. In the RELATED TASKS section, click on MANAGE OTHER PROGRAMS’ ACCESS TO SKYPE. 4. The MANAGE API ACCESS CONTROL window will popup. In the window, select AUVIDUAL.EXE. Then click the CHANGE button on the right side. 5.
For Windows 2000: 1. Click on START and then select SETTINGS > CONTROL PANEL. 2. Double click on SOUNDS AND MULTIMEDIA and click on the Audio tab. 3. From Sound Playback pull down box, select USB AUDIO DRIVE and click the APPLY key at the bottom; then click on the VOLUME key. 4. Adjust the volume using the slider; close the window when finished. Return to Sound Playback pull down box; select the original sound device and click OK to save and exit.
During the registration period, SEARCH BASE will appear on the handset. A confirmation tone will be heard if the registration is successful. The handset label, the handset number and the clock will be displayed. The status icon will be shown as well if the PC is setup properly with the base. If the registration is not successful, the previously unregistered handset will continue to say UNREGISTERED. If the phone will not register, please repeat the steps and try again.
Calling a Skype™ user from contact list: 1. Press S key. 2. Press the UP or DOWN keys to select the SKYPE user to call. 3. Press the TALK key or S key to call the selected contact. The contact’s name will be displayed and the contact will be called. Contact list: The contact list shows the SKYPE contact list of the user who is currently logged into Skype. Changing user status: Skype status can be changed through the PHIP65. To reference this, see CHANGE ONLINE STATUS.
Entering a pause: Press and hold the # where you want to enter a pause. Calling a number with the landline: 1. Enter the digits to dial and press the TALK key. OR 2. Press the TALK key and then enter the digits to dial. Redial: The PHIP65 records the last 10 dialed numbers stored in the redial memory. The first 32 digits / characters of each number / contact are stored. To redial one of the last 10 dialed numbers / contacts: 1. Press the REDIAL key. The most recently dialed number will appear. 2.
Quick dialing: Specified numbers can be set to quick dial by simply assigning a designated contact from the phone book to any number on the PHIP65 keypad. To do this, simply find a contact in the phone book and during standby mode, press and hold a specified number on the keypad. Making 3-way Skype™ conference calls: Start a 3-way conference call. 1. Call the first Skype contact. 2. After the first party answers, press the TALK key to seize the line and make a Skype call to the second party. 3.
Second calls: If using Skype, users can make or receive calls without extra charges. If using a landline, the call waiting feature must be purchased through the local phone company. Second outgoing calls: Users can only make second outgoing calls via the line your current call is on. If on a Skype call, users can call other Skype users or make SkypeOut calls. If on a landline, users may only call other landline contacts.
Chain dialing: Call contacts from the phone book even after the user has seized the phone line. There is no limit to the number of times chain dialing is accessed. 1. Press and hold the PHONEBOOK key for 2 seconds. 2. Press the UP or DOWN keys to scroll through the phone book records. Use the number keys to jump directly to the record starting with the corresponding letters of that key. 3. Press the OK key. NOTE: To exit the Chain Dialing mode, simply press the EXIT key.
Using the mute function: During a call, if the user wishes to speak to someone privately without having the caller hear the conversation, follow the steps provided below: 1. Press the MUTE key;this turns off the microphone and will not allow sound to come through the caller’s earpiece. 2. Press the MUTE key again to cancel the muting feature. This will allow voice and noise transmissions back into the earpiece of the caller. Using The Phone Book Use the phone book to manage entries stored in the phone.
Storing entries: Please note that contacts on the Skype contact list cannot be stored to either of the phone books. Memory full: If the phone book is full, FULL will be displayed on the phone’s LCD screen. 4. Enter the name of the contact. A name must be entered and it must be unique. Press the OK key. 5. Enter the contact’s number to store into the phone book. Press the OK key. Entering a Pause: Press and hold the “#” key where you want to enter a pause.
Copying entries in a phone book: Information from the entries can be shared by copying the entries from the private phone book to the shared phone book and vice-versa. 1. Press the MENU key and select PHONEBOOK and press the OK key. 2. Press the UP or DOWN keys to select phone book to open; PRIVATE or SHARED. Press the OK key. 3. Press the UP or DOWN keys to select TO SHARED or TO PRIVATE, and then press the OK key. 4.
Deleting quick dial numbers: 1. Press the MENU key and select PHONEBOOK and press the OK key. 2. Press the UP or DOWN keys to select PRIVATE phone book, and then press the OK key. 3. Press the UP or DOWN keys to select QUICK DIAL, andpress the OK key. The first quick dial key is displayed. 4. Press the UP or DOWN keys to scroll to the quick dial key desired to delete, and press the OK key. 5. Press the UP or DOWN keys to select DELETE. press the OK key. 6. CONFIRM? is displayed on the LCD screen.
Viewing available space in phone book: The phone keeps track of how many memory slots have been used and how many are still available. To view this information, follow the steps below. 1. Press the MENU key and select PHONEBOOK and press the OK key. 2. Press the UP or DOWN keys to select which phone book to open; PRIV PRIVATE or SHARED, press the OK key. 3. Press the UP or DOWN keys to select STATUS. Press the OK key to view the new status. Press the OK key again when finished.
Call History The phone keeps a record of each time a call comes in or goes out. Users can access a list of up to 15 missed calls and 5 received calls. If the user has subscribed to a caller ID service from the local phone company, both landline and Skype calls will be automatically stored. Otherwise only Skype calls will be stored. If you have more than one handset, each handset has its own call list.
Calling a number from the history list: When users view the call history, they can return a missed or received call by selecting the contact and pressing the TALK key. The call will be returned using the same service the original call was placed through. Saving recorded numbers from the history list: If a call comes in and the contact is not stored in the phone book, an option to save directly from the call history log is available on the PHIP65. To do so, follow the steps below. 1. Press the MENU key. 2.
Stripping an area code: Users can strip the area code from the incoming caller’s number. A return call can be made directly using the number in the call history. The area code can be up to 5 digits long. The area code will be removed from the incoming caller’s number that corresponds to the entered area code. To strip the area code, follow the steps provided below. 1. Press the MENU key. 2. Select ADVANCED SET and press the OK key. 3. Select AREA CODE and press the OK key. 4.
Deleting a dialed number in the call list: While scrolling through the history of outgoing calls, the user can delete any number from the list using the following: 1. Press the MENU key. 2. Select DELETE and press the OK key. 3. Press the OK key again to confirm deletion. Deleting an entire dialed call list: While the user is scrolling through the history of outgoing calls, he / she can delete all the numbers from the list using the following: 1. Press the MENU key. 2.
Checking voicemail messages: The PHIP65 allows the user to access their Skype Voicemail box with just a few key presses. Skype Voicemail: To get a voicemail account, please go to www.skype.com/products/skypevoicemail for further details. New Voicemail: When there is a new voicemail, the icon appears on the top line of the display during standby. The icon will be gone when all voicemails have been deleted. Retrieving voicemail messages: 1. Press the MENU key. 2. Press the UP or DOWN keys to select SKYPE.
Personalizing The PHIP65 The PHIP65 comes with a selection of settings that the user can change to personalize the phone. Personalizing the phone will be done using the individual menu options. At any time the user can press BACK to exit the current menu or cancel the confirmation. If EXIT is pressed, the phone will simply abort all programming and return to standby. Personalizing the phone’s display: Give the phone a name.
Turning the backlight on and off: The display and keypad will be lit when the phone is being used. 1. Press the MENU key and select PERSONAL SET. Press the OK key. 2. Select BACKLIT and press the OK key. The current BACKLIT is displayed. 3. Select ON or OFF and then press the OK key to confirm. Personalize the handset’s sounds: Users can assign different ring tones for each handset at different volume levels. Users can also select a different ring tone for Skype, landline, and intercom calls. 1.
Setting the handset’s time: The time is displayed during standby mode. 1. Press the MENU key. 2. Select CLOCK / ALARM and press the OK key. 3. Select SET CLOCK and press the OK key . The current time is displayed. 4. Edit the time by using the digit keys. 5. Press the OK key to confirm. Setting the handset’s alarm: Users can set the alarm time and personalize the alarm tone. 1. Press the MENU key. 2. Select CLOCK / ALARM and press the OK key. 3. Select SET ALARM and press the OK key. 4.
Setting alarm volume: 1. Press the MENU key. 2. Select CLOCK / ALARM and press the OK key. 3. Select ALARM TONE and press the OK key. 4. Select VOLUME and press the OK key. 5. Select desired volume and press the OK key. Advanced Features Transferring Skype calls from the PC to the handset: 1. In the system tray on the PC, right-click the Auvi icon and select USE PC. 2. Initiate a Skype call through the Skype application on the PC. 3.
Changing dial mode: 1. Press the Menu key and select ADVANCED SET. Press the OK key. 2. Select DIAL MODE and press the ok key. The current setting will be displayed. 3. Select TONE or PULSE and press the OK key to confirm. Temporary tone dialing in pulse mode: If the dialing mode is set to pulse, the user can press and hold the STAR key to set temporary tone dialing. D will be displayed on the screen. Tone dialing will continue until the user hangs up the handset. Setting a pause: 1.
Setting the voicemail waiting indicator (VMWI): 1. Press the MENU key and select ADVANCED SET. Press the OK key. 2. Select VMWI and press the OK key. 3. DELETE? will show on the screen. Press the OK key again to confirm. Registering a handset: Each base can register up to 4 handsets. Each handset can register up to 4 bases. 1. Press the MENU key. 2. Select ADV ADVANCED SET and press the OK key. 3. Select REGISTRATION and press the OK key. 4.
4. Select the handset desired to unregister and press the OK key. 5. Enter the default PIN (0000) and press the OK key. Selecting a base unit: If the handset is registered to more than 1 base, users can select which base the handset will use. 1. Press the MENU key. 2. Select ADVANCED SET and press the OK key. 3. Select BASE SELECT and press the OK key. 4. Select the base to use and press the OK key.
Turning handset’s ringer on and off: Users can use this shortcut to turn on and off the handset ringer. 1. Press and hold the RINGER OFF key. Note: appears to indicate the ringer is turned off. The handset will not emit any sound for any incoming call. View message waiting indicator (VMWI) If you have subscribed to the voicemail service from the local phone company and / or Skype, turns on when you have a new message in either of the voicemail-mailboxes.
ExtraMulti-Handsets Features Using NOTE: The user will need at least 2 handsets to carry out the functions mentioned in this section. Call someone within the same building: Users can call someone in the building by using the intercom feature on the phone. 1. Press the INTERCOM key. 2. Select the handset desired to call and press the OK key OR press the number of the handset desired to call. 3. Wait for the other handset to answer the call.
M aking 3-way calls: Extra Features Using multi-handsets Invite another handset to join in on a phone call. 1. Press the INTERCOM key. 2. Select the handset desired to call and press the OK key or the number of the handset desired to call. 3. Wait for the other handset to answer the call. 4. When the other handset has answered the call, press the CONFERENCE key or place the handset back on the charger. The external call has now been transferred.
Extra Features Trouble Shooting Problem(s) Solution(s) No dial tone when pressing TALK. - Make sure that the adapter and the phone cord are connected properly. - Check to ensure that the batteries are fully charged and installed properly. - This phone does not work during power failure. Signal icon is flashing. - Register your handset to a base. - Move closer to the base unit. The phone does not ring. - Make sure the adapter and the phone cord are connected properly.
Problem(s) Solution(s) Cannot hear the other party clearly / speaker too loud / quiet. - Refer to making calls - Adjusting the speaker volume on your PC. Cannot make SkypeOut calls. - Enter 00, + (press and hold 0) or 011 before the number to dial. - Check available SkypeOut credits. - Check to see if a link is established between the handset and the base. - Refer to “Calling A Landline Number With SkypeOut” for more information. Busy tone is returned while making Skype call.
Extra Features Compliance Statement Equipment approval information: Your telephone equipment is approved for connection to the Public Switched Telephone Network and is in compliance with parts 15 and 68, FCC Rules and Regulations and the Technical Requirements for Telephone Terminal Equipment Published by ACTA. Notification to the local telephone company: On the bottom of this equipment is a label indicating, among other information, the US number and Ringer Equivalence Number (REN) for the equipment.
The telephone company may make changes in its communications facilities, equipment, operations or procedures where such action is required in the operation of its business and not inconsistent with FCC Rules and Regulations. If these changes are expected to affect the use or performance of your telephone equipment, the telephone company must give you adequate notice, in writing, to allow you to maintain uninterrupted service. Interference Information: This device complies with Part 15 of the FCC Rules.
FCC RF radiation exposure statement: This equipment complies with FCC RF radiation exposure limits set forth for an uncontrolled environment. This equipment should be installed and operated with a minimum distance of 20 centimeters between the radiator and your body. This transmitter must not be co-located or operated in conjunction with any other antenna or transmitter. For hand-held operation, this phone has been tested and meets the FCC RF exposure guidelines.
Auvi Electronics N.A. warrants this product to the original purchaser to be free from defects in material and workmanship, under normal conditions, for a period of 90 days for parts and labor and 1 year for parts only from the date of original purchase. Auvi Electronics N.A. agrees at our option during the warranty period to repair any defect in material or workmanship or to furnish an equal product in exchange without repair charges during the first 90 days.
® VISION BEYOND SOUND ® Auvi Electronics N.A. & Auvi Electronics L.A. Retail Divisions of Auvi Technologies 5988 Mid Rivers Mall Drive St. Charles, MO 63304 www.auviworld.com For customer service inquiries in the U.S. and Canada, please email custservice@auviusa.com For customer service inquiries in Latin and South America, please email custserviceLA@auviworld.com © 2006 Auvi Technologies, LLC. All Rights Reserved. Auvi Electronics N.A., LLC and Auvi Electronics L.A.