
User Guide

11. Swing swaybar up near rack-n-pinion and re-install the lower subframe in the reverse order of steps 3
thru 8.
12. Install the supplied Autotech swaybar brackets and spacers
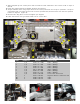
13. Torque subframe bolts using torque wrench. The factory fasteners are torque to yield bolts. Torque to
yield means that you torque all the bolts to their specified value, and then turn each bolt the specified
number of degrees. (Figure 2)
14. Re-Install the “Dog Bone” mount and tighten per diagram
15. Lower vehicle back onto ground and take car for a test drive.
Figure 1 Figure 2 Figure 3
1L
2L
2L
4L
5L
4L
5L
6L
7L
8L
9
10A
10B
2R
1R
2R
4R
5R
4R
6R
5R
7R
8R
3L 3R
Num. L/R/Center Bolt Size
Tourque Value
1 L / R M12 x 1.5 x100 52lbs + (90deg.)
2 L / R M12 x 1.5 x90 52lbs + (90deg.)
3 L / R M10 x 1.5 x76 37lbs + (90deg.)
4 L / R M12 x 1.5 x90 52lbs + (90deg.)
5 L / R M8 x 1.25 x80 15lbs + (90deg.)
6 L / R M12 x 1.5 x90 52lbs + (90deg.)
7 L / R M12 x 1.5 x75 52lbs + (90deg.)
8 L / R M12 x 1.75 x110 Front Lower A-arm Bolt
9 C M14 x 1.75 x70 Dog-Bone Mount to Subframe bolt
10A C M10 x 1.75 x35 44lbs.
10B C M10 x 1.75 x75 44lbs.