
Installation guide


CT-3400 TW Installation Guide P.11
Note:
The unit will stay in programming mode until the hood pin-switch or the brake
pedal is pressed again. Therefore, take your time to make the proper
selection. Pressing the brake pedal will bring you back to the programming
menu, where you can select another mode.
Each mode has functions for which options must be selected. Once you have selected Mode 1,
Mode 2, or Mode 3, the system automatically moves to function one. You must then select the desired
option for each function. Once you have selected an option, you will move to the next function, and so
on.
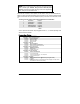
To select one of four options, press the appropriate button on the transmitter:
• LOCK button = Option 1
• UNLOCK button = Option 2
• TRUNK button = Option 3
• START/STOP button = Option 4
• F then LOCK button =Option 5.
Table 4
Once an option has been selected, the parking lights will flash 1, 2, 3, or 4 times, depending on the
option that has been selected.
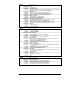
Programming Options
MODE 1
* INDICATES DEFAULT SETTING
FUNCTION 1 – Ignition-controlled door locks
OPTION 1* Ignition lock disabled
OPTION 2 Ignition lock enabled
OPTION 3 Ignition unlock ONLY
OPTION 4 Ignition lock ONLY
FUNCTION 2 – Secure lock
OPTION 1* Secure lock disabled
OPTION 2 Secure lock enabled in standard mode
OPTION 3 Smart secure lock enabled in smart mode
FUNCTION 3 – Passive or active arming
OPTION 1* PASSIVE arming (60 sec.)
OPTION 2 ACTIVE arming
OPTION 3 PASSIVE arming (3 min.)
FUNCTION 4 – Door lock pulse timing
OPTION 1* 7/10-sec. lock/unlock pulses
OPTION 2 4-sec. lock/unlock pulses
OPTION 3 7/10-sec. lock pulse and two ¼ -sec. unlock pulses
OPTION 4 1/10-sec. lock/unlock pulses
FUNCTION 5 – LED flashing
OPTION 1* ENABLED (without starter kill Æ will flash only when ignition is OFF)
OPTION 2 DISABLED
OPTION 3 ENABLED (with starter kill Æ will flash when the starter kill engages. This option should
be selected ONLY if the starter kill is installed.)