
User guide

P/N. 11016-001 Rev. January 7, 2005 Page 2-7
User Guide
AutoPulse™ Resuscitation System Model 100
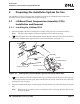
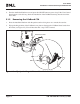
2.2 Battery Installation and Removal
For more information on the AutoPulse Power System and its components, refer to the AutoPulse Power
System User Guide.
Press the Status Check button on the Battery to ensure it is fully charged before insertion into the
AutoPulse Platform and before patient use (refer to the “Performing a Battery Status Check” section in
the AutoPulse Power System User Guide for more information). You should only use batteries that
illuminate the green status light-emitting diode (LED).
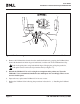
Caution: Remove the protective plastic cap from the Battery before attempting to charge the Battery.
Batteries remaining in the AutoPulse Platform should be checked regularly for appropriate charge status.
Low Batteries should be replaced with charged Batteries.
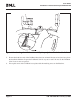
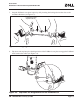
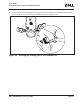
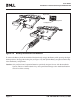
To install the Battery, slide the Battery into the Battery compartment in the AutoPulse Platform. The
Battery should snap into place and mount flush with the AutoPulse Platform.
The Battery is mechanically keyed so that it can only be inserted in one orientation. Do not force or slam
the Battery into the Battery compartment. If resistance is met, check for appropriate orientation, and
check to insure there are no obstructions to Battery insertion.
Ensure that the Battery is securely latched (snaps into place) before moving the AutoPulse Platform or
initiating chest compression.