
Installation Manual


5
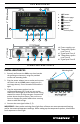
ZONE A SETUP
Presss
to cycle through the following
opons: Zone A Setup; Zone A Output
Schedule; Zone B Setup; Zone B Output
Schedule; and System Seng.
NOTE: All sengs must be saved by
pressing
for the controller to operate.
Pressing twice will take you back to
the ENVIRONMENT CONDITIONS home
screen. 45 seconds of inacvity will
automacally revert to home screen.
1. Press
and enter the ZONE A menu.
2. Press
to cursor through the values and highlight the value you want to change.
Press
or
to select the correct seng, then press
to conrm.
Ensure zone Status is set to “OFF” prior to the inial me OUTPUT SCHEDULE programming
on Zone setup.
Value Descripon
Type Type of lights installed in ZONE A (or B): 1000W MH, 1000W CMH, 1000W HPS,
945W CMH, 750W MH, 750W HPS, 630W CMH, 600W X 2 HPS, 600W X 2 MH,
600W MH, 600W HPS, 400W MH, 400W HPS, 315W x 2 CMH, 315W CMH, 250W
MH, 250W HPS, 680W LED, 640W LED, 600W LED, 480W LED, 320W LED
Status Indicates current xture waage or percentage according to photo period mer
(OUTPUT SCHEDULE). User can manually override mer to adjust output if
needed and the W or % will be followed by “OVRD”. Fixtures will revert to mer
schedule once next output me/seng is reached. Example: If manual override
is adjusted from 100% down to 60% at 7:45 PM, the display will be “Status: 60%
OVRD” and will remain unl the next “OUTPUT” signal is sent by the controller. If
“OUTPUT” at 8:00 PM is scheduled to send 100% signal, the xture will revert to
mer schedule.
Dim The temperature limit at which the lights will auto-dim.
Stop The temperature limit at which the lights will auto-shutdown.
Delay (0–30 min) Hot start prevenon to allow HID lamps adequate me to cool to
prevent lamp damage. For HID, minimum seng should be 15 min. For LED,
seng can be 0 min.
R/S (0–30 min) The me lights will take to gradually reach full power (R=sunrise) or
turn o (S=sunset). Longer is more gradual. This seng will aect the OUTPUT
SCHEDULE. See page 6 for more details.
3. Repeat step 2 to set all values.
4. Press
to save the sengs.
5. Repeat steps for ZONE B.
INSTRUCTIONS