Operating Instructions Digital Cordless Phone Model No. KX-TG6711NZ KX-TG6712NZ Digital Cordless Answering System Model No. KX-TG6721NZ KX-TG6722NZ Model shown is KX-TG6711. Before initial use, see “Getting Started” on page 10. Thank you for purchasing a Panasonic product. Please read these operating instructions before using the unit and save them for future reference. Please access our online customer survey: http://panasonic.net/pcc/tel/q TG6711_21NZ(en)_0216_ver011.
Table of Contents Introduction Model composition .......................................3 Accessory information ..................................4 Important Information For your safety .............................................6 Important safety instructions ........................7 For best performance ...................................8 Other information .........................................8 Specifications ...............................................9 Getting Started Setting up ...........
Introduction Model composition Base unit Handset Part No. Part No. KX-TG6711 KX-TG6711 KX-TGA671 1 KX-TG6712 KX-TG6711 KX-TGA671 2 KX-TG6721 KX-TG6721 KX-TGA671 1 KX-TG6722 KX-TG6721 KX-TGA671 2 Series Model No.
Introduction Accessory information Supplied accessories No. No. Quantity Accessory item/Part number KX-TG6711 KX-TG6721 KX-TG6712 KX-TG6722 A AC adaptor/PNLV226AL 1 2 B Telephone line cord 1 1 C Rechargeable batteries*1 2 4 D Handset cover*2 1 2 E Charger – 1 *1 *2 See page 4 for replacement battery information. The handset cover comes attached to the handset. A B C D E Additional/replacement accessories Please contact your nearest Panasonic dealer for sales information.
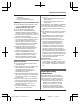
Introduction Expanding your phone system Handset (optional): KX-TGA671AZ You can expand your phone system by registering optional handsets (6 max.) to a single base unit. R Optional handsets may be a different colour from that of the supplied handsets. 5 TG6711_21NZ(en)_0216_ver011.
Important Information R Do not allow the AC adaptor or telephone line cord to be excessively pulled, bent or placed under heavy objects. For your safety To prevent severe injury and loss of life/ property, read this section carefully before using the product to ensure proper and safe operation of your product. WARNING Power connection R Use only the power source marked on the product. R Do not overload power outlets and extension cords. This can result in the risk of fire or electric shock.
Important Information – the handset batteries need recharging or have failed. – there is a power failure. – the key lock feature is turned on. Battery R We recommend using the batteries noted on page 4. USE ONLY rechargeable Ni-MH batteries AAA (R03) size. R Do not mix old and new batteries. R Do not open or mutilate the batteries. Released electrolyte from the batteries is corrosive and may cause burns or injury to the eyes or skin. The electrolyte is toxic and may be harmful if swallowed.
Important Information There may be a remote risk of electric shock from lightning. 3. Do not use the telephone to report a gas leak in the vicinity of the leak. 4. Use only the power cord and batteries indicated in this manual. Do not dispose of batteries in a fire. They may explode. Check with local codes for possible special disposal instructions.
Important Information Information on Disposal in other Countries outside the European Union These symbols are only valid in the European Union. If you wish to discard these items, please contact your local authorities or dealer and ask for the correct method of disposal. Specifications R Standard: GAP (Generic Access Profile) R Frequency range: 1.88 GHz to 1.90 GHz R RF transmission power: Approx.
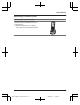
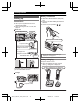
Getting Started Battery installation Setting up Connections R Use only the supplied Panasonic AC adaptor PNLV226AL. R When mounting the unit on a wall, see page 16. R USE ONLY Ni-MH batteries AAA (R03) size. R Do NOT use Alkaline/Manganese/Ni-Cd batteries. R Confirm correct polarities ( , ). n Base unit Press plug firmly. “Click” Rechargeable Ni-MH ONLY Hook To power outlet Use only the supplied telephone line cord.
Getting Started Icon Note when setting up Note for connections R The AC adaptor must remain connected at all times. (It is normal for the adaptor to feel warm during use.) R The AC adaptor should be connected to a vertically oriented or floor-mounted AC outlet. Do not connect the AC adaptor to a ceiling-mounted AC outlet, as the weight of the adaptor may cause it to become disconnected. R The unit is not designed to be used with rotary/pulse dialling services.
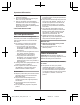
Getting Started Receiver Controls Display Handset R: Recall/Flash MR/ECON A ECO: Eco mode shortcut key M G N (Off/Power) Microphone Charge contacts H B C D I E J F K L n Control type Soft keys The handset features 3 soft keys. By pressing a soft key, you can select the feature shown directly above it on the display. Navigator key – MDN, MCN, MFN, or MEN: Scroll through various lists and items. – (Volume: MDN or MCN): Adjust the receiver or speaker volume while talking.
Getting Started n KX-TG6721 series: page 3 A B C D E Item Meaning The line is in use. R When flashing slowly: The call is put on hold. R When flashing rapidly: An incoming call is now being received. Missed call*1 (page 33) The base unit transmission power is set to “Low”. (page 16) F G H The LCD and key backlight is off. (page 26) I R When displayed next to the battery icon: Answering system is on.*2 (page 35) R When displayed with a number: New messages have been recorded.
Getting Started Item IN USE *1 *2 *3 Meaning Icon Answering system is being used by another handset or the base unit.*2 Action Displays the character entry mode for phonebook search. (page 22) Turns the key lock feature off. (page 20) Caller ID subscribers only KX-TG6721 series: page 3 Voice mail subscribers only Stops alarm. (page 29) Base unit display items Snooze button on the alarm. (page 29) n KX-TG6721 series: page 3 Selects a character entry mode.
Getting Started Turning the power on/off Power on N for about 1 second. Press M Power off N for about 2 seconds. Press M Initial settings n Direct command code: Programmable settings can be accessed by , # and then the pressing corresponding code on the dial keypad (page 24). #101. Example: Press n Symbol meaning: Example: MbN: “Off” Press MCN or MDN to select the words in quotations. Display language 1 2 MbN: Select your desired language.
Getting Started R When the unit has new messages*1 and missed calls, the unit can be operated to play the new messages first and then show the missed calls. *1 KX-TG6721 series: page 3 Note: R While key lock is on (page 20), incoming calls can be answered, but the following features are disabled even when the smart function indicator flashes slowly. – Listen to new messages.*1 (page 37) – View the caller list when there are missed calls.
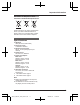
Getting Started n Charger 25 mm Screws Hooks 17 TG6711_21NZ(en)_0216_ver011.
Making/Answering Calls When storing a calling card access number and/or PIN in the phonebook, a pause is also needed (page 23). Example: If you need to dial the line access number “0” when making outside calls with a PBX: Making calls 1 Lift the handset and dial the phone number. R To correct a digit, press . 2 3 Press M N or . When you finish talking, press M N or place the handset on the base unit or charger. 1 2 0a Dial the phone number.
Making/Answering Calls n Programming the volume beforehand: 1 #160 2 3 MbN: Select the desired volume. aM N Temporary handset ringer off While the handset is ringing for a call, you can turn the ringer off temporarily by pressing . Useful features during a call Hold This feature allows you to put an outside call on hold. 1 2 3 Press during an outside call. MbN: “Hold” a To release hold, press M N. R Another handset user can take the call by pressing M N.
Making/Answering Calls emphasise existing line noise. If it becomes difficult to hear, turn this feature off. R This feature is not available while using the speakerphone. R R Call share You can join an existing outside call. To join the conversation, press M N when the other handset is on an outside call. Note: R To prevent other users from joining your conversations with outside callers, turn the privacy mode on (page 27).
Making/Answering Calls 3 When the other party answers the call, keep the handset on the base unit and talk using the speakerphone. 4 When you finish talking, press M N. Note: R In step 2, if you do not place the handset on the base unit within 1 minute, the power back-up mode turns off. In this case, press N on the handset and dial the phone M number. Then try again from step 2.
Phonebook Handset phonebook 2 Press the dial key (0 to 9, or #) which contains the character you are searching for (page 42). R Press the same dial key repeatedly to display the first entry corresponding to each character located on that dial key. R If there is no entry corresponding to the character you selected, the next entry is displayed. 3 MbN: Scroll through the phonebook if necessary. 4 M The phonebook allows you to make calls without having to dial manually.
Phonebook 1 2 3 4 During an outside call, press . MbN: “Phonebook” a MbN: Select the desired entry. to dial the number. Press Note: R When storing a calling card access number and your PIN in the phonebook as one phonebook entry, press to add pauses after the number and PIN as necessary (page 18). Copying phonebook entries You can copy phonebook entries between 2 handsets. Copying an entry 1 Find the desired entry (page 22).
Programming Programmable settings You can customise the unit by programming the following features using the handset. To access the features, there are 2 methods. n Scrolling through the display menus 1 2 3 4 Press MCN, MDN, MEN, or MFN to select the desired main menu. a Press MCN or MDN to select the desired item from the next sub-menus. a Press MCN or MDN to select the desired setting. a R This step may vary depending on the feature being programmed. N.
Programming Sub-menu 1 Sub-menu 2 Settings Code Settings Number of Rings*2 2–9: 2-9 Rings 5: <5 Rings> 0: Auto #211 39 Recording Time*2 1: 1 Minute 3: <3 Minutes> 0: Greeting Only*3 #305 39 – #306 37 #310 35 Remote Code*2 Call Screening 1: 0: Off Answer On*2 – – #327 35 Answer Off*2 – – #328 35 Main menu: “Time Settings” Sub-menu 1 Sub-menu 2 – Set Date/Time*2 Memo Alarm 1–3: Alarm1-3 – Time Adjustment*2, *4 Main menu: Settings Code – #101 15 1: Once 2: Daily 3
Programming Main menu: “Initial Setup” Sub-menu 1 Sub-menu 2 Settings Code Ringer Setup Ringer Volume – Handset 0–6: Off–6 <6> #160 19 Ringer Volume – Base Unit*1, *2 0–6: Off–6 <3> #G160 – Ringtone*5, *6 (Handset) #161 – Night Mode – On/Off 1: On 0: #238 29 Night Mode – Start/End <23:00/06:00> #237 29 Night Mode – Ring Delay 1: 30 sec. 2: <60 sec.> 3: 90 sec. 4: 120 sec.
Programming Sub-menu 1 Sub-menu 2 Settings Code Line Setup Recall/Flash*2, *10 0: 900 msec. 1: 700 msec. 2: <600 msec.> 3: 400 msec. 4: 300 msec. 5: 250 msec. G: 200 msec. #: 160 msec. 6: 110 msec. 7: 100 msec. 8: 90 msec. 9: 80 msec. #121 19 Privacy Mode*2, *11 – 1: On 0: #194 – Base Unit PIN*2 – <0000> #132 31 – 1: On 0: #138 32 Register H.
Programming *2 If you program these settings using one of the handsets, you do not need to program the same item using another handset. *3 This menu is not displayed when scrolling through the display menus. It is only available in direct command code. *4 This feature allows the unit to automatically adjust the date and time each time caller information including date and time is received. To turn this feature on, select “Caller ID”. To turn this feature off, select “Manual”.
Programming n Weekly: MbN: Select the desired day of the week and press .a 5 6 Set the desired time. a 7 MbN: Select the desired alarm tone. a Turning night mode on/off 1 2 Enter a text memo (10 characters max.; page 42). a #238 MbN: Select the desired setting. a R If you select “Off”, press M N to exit. 3 Enter the desired hour and minute you wish to start this feature. a R You can select 24-hour or 12-hour clock format (“AM” or “PM”) by pressing .
Programming “Yes” without entering any handset name, “Handset 1” to “Handset 6” is displayed. 1 2 3 4 5 2 Enter the phone number (24 digits max.). a R To erase a digit, press . 3 M #104 Enter the desired name (max. 10 characters; page 42). R If not required, go to step 3. Viewing/editing/erasing bar call numbers MbN: Select the desired setting.
Programming Setting call restriction You can restrict selected handsets from dialling certain numbers. You can assign up to 6 phone numbers to be restricted, and select which handsets are to be restricted. Storing area codes here prevents the restricted handsets from dialling any phone number in that area code. 1 2 3 4 5 6 #256 Enter the base unit PIN (default: “0000”). R If you forget your PIN, contact an authorised service centre. Select the handsets to be restricted by pressing 1 to 6.
Programming R When the handset has been registered is displayed. successfully, Note: R While registering, “Base in registering” is displayed on all registered handsets. R When you purchase an additional handset, refer to the additional handset’s installation manual for registration. Deregistering a handset A handset can cancel its own registration to the base unit, or other handsets registered to the same base unit. This allows the handset to end its wireless connection with the system.
Caller ID Service Using Caller ID service Important: R This unit is Caller ID compatible. To use Caller ID features, you must subscribe to a Caller ID service. Contact your service provider/telephone company for details. R For all local and national incoming calls, your display will show the area code (e.g. 09 for Auckland) or the cellular prefix (e.g. 0274 for Telecom Cellular) followed by the caller’s telephone number. An Auckland caller’s number will be displayed as 09XXXXXXX.
Caller ID Service 2 3 Press MCN to search from the most recent call, or press MDN to search from the oldest call. R If is displayed, not all of the information is shown. To see the remaining information, press MEN. To return to the previous screen, press MFN. To call back, press M N. N. To exit, press M Note: R If the entry has already been viewed or answered, “ ” is displayed, even if it was viewed or answered using another handset.
Answering System message asking callers to call again later. – If you recorded your own greeting message, the same message is still announced to callers even though their messages are not recorded. Answering system Available for: KX-TG6721 series (page 3) The answering system can answer and record calls for you when you are unavailable to answer the phone.
Answering System Greeting message When the unit answers a call, a greeting message is played to callers. You can use either: – your own greeting message – a pre-recorded greeting message Recording your greeting message 1 2 3 4 5 #302 MbN: “Yes” a After a beep sounds, hold the handset about 20 cm away and speak clearly into the microphone (2 minutes and 30 seconds max.). Press M to stop recording.
Answering System 1 2 To listen to new messages: #323 To listen to all messages: #324 Operation *6 Reset to a pre-recorded greeting message *1 N. When finished, press M Key Note: R To switch to the receiver, press M N. Using the smart function key When is displayed and the smart function indicator flashes slowly, there are new messages. Press MSmart functionN in step 1 on “Listening to messages using the handset”, page 36. R “New Message” must be set to “On” in Top key setup (page 16).
Answering System remotely. This code prevents unauthorised parties from listening to your messages remotely. Important: R In order to operate the answering system remotely, you must first set a remote access code.
Answering System permanently or temporarily. Alternatively you can leave this service connected and change the “Number of Rings” to a shorter duration on your unit so your unit’s answering machine can pick up the call prior to the service provided by your service provider/telephone company. Answering system settings Number of rings before the unit answers a call You can change the number of times the phone rings “Number of Rings” before the unit answers a call. You can select 2 to 9 rings, or “Auto”.
Voice Mail Service Voice mail service To receive Call Minder or Message Mailbox messages, please note the following: “Call Minder” and “Message Mailbox” are automatic answering services offered by your service provider/telephone company. After you subscribe to this service, your service provider/ telephone company’s voice mail system answers calls for you when you are unavailable to answer the phone or when your line is busy.
Intercom/Locator Intercom Intercom calls can be made between handsets. Note: R When paging the handset, the paged handset beeps for 1 minute. R If you receive an outside call while talking on the intercom, you hear 2 tones. To N, then press answer the call, press M N. M Making an intercom call 1 2 3 MbN: Select the desired unit. a R To stop paging, press M N. N. Answering an intercom call 1 2 Press M N to answer the page. When you finish talking, press M N.
Useful Information Character entry The dial keys are used to enter characters and numbers. Each dial key has multiple characters assigned to it. The characters that can be entered depend on the character entry mode (page 42). – Press MFN or MEN to move the cursor left or right. – Press dial keys to enter characters and numbers. to erase the character or number highlighted by the cursor. Press and hold to – Press erase all characters or numbers. – Press * (Aaa) to switch between uppercase and lowercase.
Useful Information Extended 1 character table ( z 1 2 ) 3 4 5 6 7 8 9 y 7 8 9 y 7 8 9 y R The following are used for both uppercase and lowercase: Extended 2 character table ( z 1 2 ) 3 4 5 6 R The following are used for both uppercase and lowercase: Cyrillic character table ( z 1 2 ) 3 4 5 6 43 TG6711_21NZ(en)_0216_ver011.
Useful Information Error messages Display message Cause/solution Base no power or No link. Reconnect AC adaptor. or No link. R The handset has lost communication with the base unit. Move closer to the base unit and try again. R Unplug the base unit’s AC adaptor to reset the unit. Reconnect the adaptor and try again. R The handset’s registration may have been cancelled. Re-register the handset (page 31). R When “No link.
Useful Information Troubleshooting If you still have difficulties after following the instructions in this section, disconnect the base unit’s AC adaptor and turn off the handset, then reconnect the base unit’s AC adaptor and turn on the handset. General use Problem Cause/solution The handset does not turn on even after installing charged batteries. R Place the handset on the base unit or charger to turn on the handset. The unit does not work. R R R R The handset display is blank.
Useful Information Problem Cause/solution I cannot register a handset to a base unit. R The maximum number of handsets (6) is already registered to the base unit. Cancel unused handset registrations from the base unit (page 32). R You entered the wrong PIN. If you forget your PIN, contact an authorised service centre. Battery recharge Problem Cause/solution The handset beeps and/or flashes. R Battery charge is low. Fully charge the batteries (page 10).
Useful Information Problem Cause/solution I cannot make a call. R If you are using a BT double adaptor to connect the unit, remove the adaptor and connect the unit to the phone wall socket directly. If the unit operates properly, check or replace the adaptor. R You dialled a call restricted number (page 31). R The key lock feature is turned on. Turn it off (page 20). R The unit is not designed to be used with rotary/pulse dialling services.
Useful Information Answering system Problem Cause/solution The unit does not record new messages. R The answering system is turned off. Turn it on (page 35). R The message memory is full. Erase unwanted messages (page 36). R The recording time is set to “Greeting Only”. Change the setting (page 39). R If you subscribe to a voice mail service, messages are recorded by your service provider/telephone company, not your telephone.
Useful Information Warranty Panasonic New Zealand undertakes to: Repair or at its option, replace without cost to the owner, either for material or labour, any part which is found to be defective within two years of the date of purchase. THIS EXPRESS WARRANTY DOES NOT COVER: 1) Pick up and delivery. 2) Batteries. 3) Repairs when the product has not been used in accordance with the Operating Instructions Manual or has been modified.
Index M Index A B C D E F H I K Additional handsets: 31 Alarm: 28 Answering calls: 18 Answering system: 35 Call screening: 35 Erasing messages: 36, 37, 38 Greeting message: 36 Greeting only: 39 Listening to messages: 36, 38 Number of rings: 39 Recording time: 39 Remote access code: 37 Remote operation: 37 Turning on/off: 35, 37, 38 Area code: 30 Auto talk: 18, 26 Battery: 10, 11 Call restriction: 31 Call share: 20 Call Waiting: 19 Call Waiting Caller ID: 19 Caller ID service: 33 Caller list: 33 Calle
Notes 51 TG6711_21NZ(en)_0216_ver011.
For your future reference We recommend keeping a record of the following information to assist with any repair under warranty. Serial No. Date of purchase (found on the bottom of the base unit) Name and address of dealer Attach your purchase receipt here. Customer Care Centre Tel. No.: (09) 272 0178 or website www.panasonic.co.