
User manual


Copyright © 1999-2002 US Automation Inc., All Rights Reserved.
7
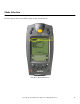
TRG3000 Trigger Handle
The TRG3000 Trigger Handle adds a pistol grip with a trigger to your EP1, increasing ergonomic comfort when
using the terminal in scan-intensive applications for extended periods of time.
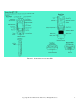
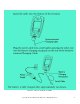
To insert the EP1 into the trigger handle:
1. Slide the EP1 into the trigger handle until it locks into place (see figure 3).
To Remove the EP1 from the trigger handle:
2. To remove the EP1, press down the release spring and pull the EP1 forward (see figure 3).
FIGURE 3. EP1 TRG3000 TRIGGER HANDLE.
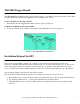
Installation/Setup of the EP1
Before using your new EP1 you must scan a sample of each of the barcodes that will be used in your
application. The EP1 will then build a rules set and know how to properly check the barcodes. In other words
by showing samples of the barcodes that you will be using at your operation to the EP1 while it is in setup
mode, you will be able teach your EP1 which type of barcodes to use when performing error proofing checks.
Start by getting samples of the barcodes that will be scanned.
The mode selected will determine how many and of which type of barcodes you need to scan.
1. Part Number mode – 2-barcode labels required (one pick ticket barcode and one parts bin label barcode).
2. Job Sequence Number mode – 1 Job Sequence Number barcode label required.
3. JSN/ Part Number mode – 2-barcode labels required (one pick ticket barcode and one parts bin label
barcode).