
User manual


Copyright © 1999-2002 US Automation Inc., All Rights Reserved.
37
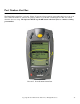
Is Your EP1 Scanner Ready to Use?
Your EP1 scanner should be ready for use after the following checklist is complete:
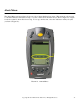
1.) The unit is fully charged (see figure 2).
2.) A mode of operation has been selected and set (see page 11).
3.) The new barcode labels have been printed out and match the mode that you have selected.
4.) You have successfully taught your EP1which barcodes it will be error proofing by stepping through the
“ Pick Ticket Setup” (see page 18) and “ Parts Bin Setup” (see page 20) sections of this manual.
5.) You have checked and cleared out all counters if necessary (see page 22).
You are now ready to scan your first Pick Ticket and Parts bin (material label) barcodes. Remember that the
pick ticket can be scanned before the parts bin barcode, or the parts bin can be scanned before the pick ticket,
the order doesn’t matter. The EP1 is looking for pairs of barcodes.
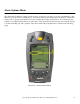
Scanning Barcodes for the First Time
The easiest way to scan barcode labels is to point the scanner at the barcode you wish to scan and hold one of
the 3 yellow scan buttons down (see figure 1, the optional pistol grip has a yellow scan (trigger) button on the
pistol grip). If you are scanning 2D barcodes remember to work the scanner from top to bottom or bottom to
top (it does not matter which way) covering 1 inch per second until you hear a beep and/or see a green light led
just above the middle yellow scan button. If you need to refresh your memory on how to scan labels refer to
figures 10 & 11.