
Installation manual

STEP 13
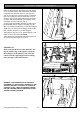
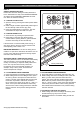
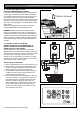
The door bracket comes in two parts. The bottom plate
with two mounting holes is used on its own for any one
piece doors. The top plate is placed over the bottom
plate and uses 4 mounting holes for extra strength.
This is used on sectional doors. (See Fig. 14).
Mount the door bracket to the centre line of the door
using M6 or equivalent screws (not supplied)
Alternatively it can be welded on steel doors.
Note: As various types of doors exist, if in doubt about
the strength of the door, reinforcement may need to be
added to the frame or panel where necessary. Damage
to the door panel may occur if the bracket is installed
incorrectly on a panel with insufficient strength. The door
opener warranty does not cover damage caused by the
opener to the door and/or door panel.
STEP 14
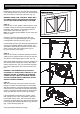
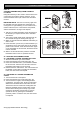
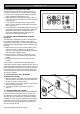
Assemble bent and straight arm with screws, and hex
nuts supplied in accessory pack. (Fig. 15) Then connect
assembled arm to the door bracket and the shuttle by
clevis pin and spring clip. shuttle must be in disengage
position. use the bend & straight arm. If installing on a
door with bad wave action, lengthening the arm even
further will assist the door operation by reducing the
wave action.
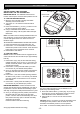
THE EASY ACCESS TRANSMITTER
The Easy Access Transmitter is prepared ready for use
with the battery pre-installed. Before the transmitter can
be operational, the Transmitter Code has to be stored
into the openers memory. To store the code please fol-
low the instructions in Step 18.1 on page 16.
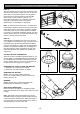
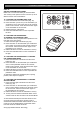
REMOVING THE COVER TO REPLACE BATTERY
1. Rotate the cover Clockwise to ‘CLOSE’
2. Rotate the cover Anti-clockwise to ‘OPEN’
REMOVING THE BATTERY
(Battery Type: 3V Lithium Battery CR1220).
Use a non - metallic object (e.g Pen) to remove the
battery. (see Fig. 18)
WARNING
Metallic objects used to remove the battery may
DAMAGE the circuit board or the battery.
REPLACING THE BATTERY
Place one side of the battery into the battery holder,
then press the battery down firmly until it clicks into a flat
position.
Note: The length of the manual release cord is user
adjustable simply by sliding the plastic toggle along the
cord to achieve the desired length. Adjust the length of
the cord so that it can be easily reached by an adult of
average height (ie. less than 1.8m tall).
Fig. 15
Fig. 18
Fig. 14
MOUNTING DOOR BRACKET AND ARMS
- 13 -
©Copyright 2006 Automatic Technology
Fig. 17Fig. 16