
Installation manual
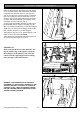
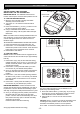

STEP 8B (METHOD TWO)
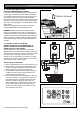
Raise the drive unit from the packing box and support
it in a horizontal position with a step ladder, then open
the garage door. Rest the opener on the open door
and use a scrap piece of wood to bring it to horizontal
level. Line up the track with the centre line on top of
the door. Secure to the ceiling above drive unit mount-
ing holes, with perforated angle (not supplied). A rep-
resentative mounting is shown. (Fig. 9)
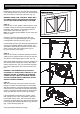
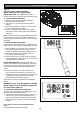
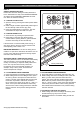
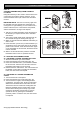
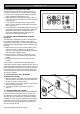
Connect angle and vibration brackets on drive units 2
flat perforated strips of angle (not supplied)
Use the
M6 X 16 Flanged Head Bolts (2) and M6 Flanged
Head Nuts (2) and secure the hanger straps to the
anti vibration brackets as per the diagrams .
The brackets may have to be pushed lightly on an
angle to allow the bolts to be fitted.
Strips should not extend more than 18mm below cen-
tre of drive unit mounting holes. (FIG. 9).
.
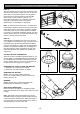
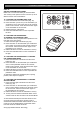
IMPORTANT:
Make sure that the head of the M6 bolt is fac-
ing the outside edge of the opener so that the
threaded part of the bolt does not come into
contact with the right angled return running
along the edge of the metal chassis..
WARNING: THE OPENER MUST BE SECURELY
FASTENED TO A STRUCTURAL SUPPORT OF THE
GARAGE. FAILURE TO FASTEN THE OPERATOR
CORRECTLY WILL LEAD TO POSSIBLE OPENER
FAILURE CAUSING SERIOUS PERSONAL INJURY
AND/OR PROPERTY DAMAGE
USING ANTI VIBRATION BRACKETS
©Copyright 2006 Automatic Technology
- 11 -