
Instruction manual


22
GDO-6v3 EasyRoller
®
Owner Installation Instructions
Accessories
28
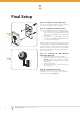
fi g
RED
BLACK
RED
BLACK
RED
BLACK
YELLOW
R1=2.2K OHM
RED,RED,RED,GOLD
.25WATT 5% TOLERANCE
RESISTANCE
R1
YELLOW
BLACK
BLACK
PWR
PE
PE-
GND
OSC
AUX
INSTALLATION INSTRUCTIONS | OWNERS COPY
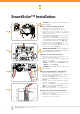
Photo Electric (PE) Beams
A photo electric (PE) Beams extends across the door
opening. This photo electric (PE) Beams is designed to
detect an obstruction while the door is closing and to
send a signal to the door opener to reverse or stop the
door movement.
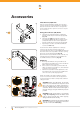
Fitting Photo Electric (PE) Beams
Attach the mounting bracket (4) to adjustment
bracket (3) with the pan head screw (6) (supplied).
(Fig. 28)
Attach the PE 2000TS bracket (2) to PE beam
transmitter (IR-200TS-TX) with four taptite screws
(m3x5) and attach the other side to adjustment
bracket (3) with the pan head screw (6) (supplied).
Repeat steps a and b to assemble the PE Beam
receiver ( IR-200TS-RX).
Locate the Photo Electric (PE) Beams in a strategic
location in the doorway. Automatic Technology
recommend that the sensor is placed 100 mm above the
fl oor level and as close as possible to the door opening.
Connect as per the wiring diagram (Fig. 30).
Use 2.2 kilo ohm resistor with the colour code red, red,
red and gold on the PE Beams receiver between the
V- and NC terminals as shown in (Fig. 30).
Alignment
Power up the PE Beams. The green LED on the
transmitter and red LED on the receiver should turn
ON to indicate power is present.
If the receiver is connected to power and the red
LED is on while the green LED is on, the transmitter
and receiver are not aligned.
Make horizontal and/or vertical adjustment on the
transmitter and/or receiver until the red LED turns
off on the receiver, indicating alignment.
NOTE: The height of the beam installation must be
chosen in such a manner that it suits the application
and environmental conditions and provides maximum
safety protection.
WARNING: When using PE Beams, the doorway
must be clear of all obstructions and persons at all
times. The location of the beams and manner in
which it is installed might not give safety protection
at all times. Check to make sure that the height of
the beam and type used give maximum protection
possible.
WARNING: Install the PE Beams as per diagram
in (Fig. 30). Tampering with the PE Beams could
result in serious personal injury and/or property
damage and will void the warranty.
WARNING! Photo Electric Beams must be installed
where the closing force as measured on the bottom
of the door is more than 400N (40kgf)
a.
b.
c.
a.
b.
c.
R1
1
2
3
4
6
5
29
fi g
30
fi g
PWR
PE
PE-
GND
OSC
AUX