
Instruction manual

14
GDO-6v3 EasyRoller
®
Owner Installation Instructions
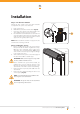
Step 5 - Mounting the Opener
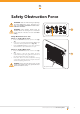
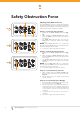
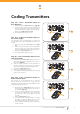
If the internal gear does not rotate freely, switch the
opener to manual by pulling the disengagement
handle down (there will be a click), so that the ring
gear can be rotated by hand.
Slide the opener over the door axle and into the
drum of the door (Fig. 09).
Ensure the internal gear is pushed in as far as
possible (without interfering with the door curtain)
and that one of the door drum’s wheel spokes is
completely between the opener’s drive forks.
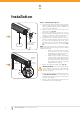
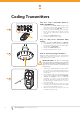
Re-attach the door bracket using your reference
marks as a guide and tighten the bolts. Ensure that
the slots in the mounting bracket of the opener
align with the slots in the door bracket, otherwise
the door bracket may have to be relocated (Fig.
10).
NOTE: If the bracket cannot be relocated, the opener
may be fi tted onto the axle using the opener’s saddle
and U-bolt as follows:
Using your reference marks as a guide,
sit the opener on the door mounting
bracket and secure with the opener’s U-
bolt and saddle and tighten fi rmly.
Adjust the door position (if necessary)
on the brackets so that the door feeds
smoothly into the guides. Make sure that
the centre of the door doesn’t hit the
lintel and that the curtain is not pushed
forward hard into the guide.
Remove the support and safety ropes (Fig. 10).
IMPORTANT NOTE - If the manual release handle
is more than 1.8 metres from fl oor level when the
opener is installed, extend the handle to a height
less than 1.8 metres.
Connect the power cord to a suitable power point,
but DO NOT SWITCH ON. Secure the power cord
away from any moving object (e.g. the door) with
the cable clip supplied.
With the opener still disengaged, pull the door up
and down to make sure it runs freely.
a.
b.
c.
d.
i.
ii.
e.
f.
g.
09
fi g
10
fi g
Installation
PULL STRING HANDLE
IF GEAR IS NOT
TURNING FREELY
UNTIE ROPE
REMOVE PROP
REFIT RIGHT
BRACKET
TIGHTEN “U”
BOLT NUTS