
Instruction manual

Owner Installation Instructions GDO-6v3 EasyRoller
®
13
Installation
07
fi g
08
fi g
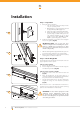
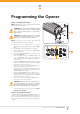
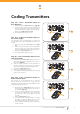
Step 3 - Pin the Door Curtain
Pinning the door curtain to the door drum maintains
security when the opener closes and locks.
Fully close the door.
Mark drill holes at both ends of the drum (Fig. 07).
Drill holes using 3.2mm (1/8”) drill bit. Open the
door slightly for easier access, if necessary.
Fit a 10 x 32mm screw and washer to each end. This
screw should be positioned as low as possible, but
make sure that it does not alter the curtain’s normal
approach to the guide (lead-in angle).
NOTE: Make sure that the screws do not project into the
area where the internal gear will fi t.
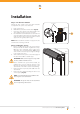
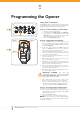
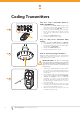
Step 4 - Fitting the opener
At the end opposite to where the opener will be
fi tted, check that the U-bolt is tightened securely.
Open the door completely and tie safety ropes
around the door roll approximately 300mm from
each end. Do not tie the ropes too tight as damage
to the curtain may ensue.
At the end where the opener is to be fi tted, support
the door with a ladder or suitable prop:
WARNING! Make sure the support is snug under
the door, stable and will not move.
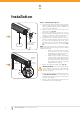
At the end where the opener will be fi tted, use
masking tape or pen to mark the position of the
U-bolt in the door bracket and the position of the
door bracket on the wall to assist in reassembling.
Remove the U-bolt (or bolts) and saddle from the
door bracket.
Remove the door bracket allowing the door to rest
on the support (Fig. 08).
NOTE - For minimum sideroom installations the
door may have to be taken down.
WARNING! The opener must not be used with a
door incorporating a wicket door.
a.
b.
c.
d.
a.
b.
d.
e.
f.
Door drum
U-bolt
Bracket
Pin Points