
2017

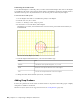
Table Of Contents
- Contents
- What's New
- Getting Started with Smoke
- Smoke Interface Overview
- Managing Projects and Users
- Organizing Media in the Workspace
- Importing and Exporting Media
- Importing File-Based Media
- Exporting Clips and Sequences to Files
- Supported File Formats
- Importing an EDL Sequence
- Importing an AAF Sequence
- Importing a Final Cut Pro XML Sequence
- MediaHub Reference: Browsing for Files
- Customizing your File Imports Options
- Applying a LUT or Colour Transform on Import
- ARRIRAW Format Settings - Import
- Audio File Settings - Import
- AVCHD Format Settings - Import
- Canon Format Settings - Import
- DPX Format Settings - Import
- HDR Format Settings - Import
- Image Sequence Settings - Import
- MP4 Format Settings - Import
- MXF Format Settings - Import
- Open Clip Format Settings - Import
- OpenEXR Format Settings - Import
- Panasonic Format Settings - Import
- Photoshop Format Settings - Import
- PNG Format Settings - Import
- QuickTime Format Settings - Import
- R3D Format Settings - Import
- Sony Format Settings - Import
- SonyRAW Format Settings - Import
- SonySStP Format Settings - Import
- XDCAM EX Format Settings - Import
- About Pixel Aspect Ratio
- About Video Field Management
- Working with Others
- Using Subtitles Files
- Python Hooks Reference
- Conform Overview
- Clip Input/Output Using a VTR
- Configuring Hardware For Clip Input and Output Using a VTR
- Configuring Software For Clip Input and Output Using a VTR
- Inputting Clips From a VTR
- Outputting Clips To a VTR
- Monitoring Video During Clip Output
- Setting Input and Output In and Out Points
- Inputting and Outputting a Live Video Signal
- Generating Proxies from VTR Input
- Capturing Material with Variable Frame Rate
- Controlling a VTR
- Audio Gain Adjustment Settings
- Setting Video Input and Output Engineering Menu Controls
- Inputting and Outputting with Headroom
- Capturing 60i Material with 2:3 Pulldown Removal
- Configuring Dual-Serial Link I/O
- VTR I/O Supported Timings
- Archiving in Smoke
- Archiving a Project to a File-based Archive
- Restoring a Project from a File-based Archive
- Archiving Clips to a File-based Archive
- Restoring Material from a File-based Archive
- Tips for Using Archives
- Managing the Size of an Archive
- Supplementing Archives with System Drive Backups
- Restoring Legacy Archives
- Deleting Content from an Archive
- MediaHub Reference: Browsing for Archives
- Playing Back Media
- Playback
- Playing Back Clips in the Full Screen Player
- Jogging and Panning a Clip
- Switching the Playback Focus between the Source and Sequence Clips
- Comparing Three Shots in the Triptych Player
- Play Back Speed Indicators
- Comparing Tracks in Split Screen
- Creating a Subclip in the Player
- Accessing Clip Information
- Player options
- Cue Marks
- Playback Options
- Setting up the Image Display Viewer in the Tools
- Setting up the Image Display Viewer in the Player
- Viewing Image Overlays in Batch
- Viewing Image Overlays in the Player
- Modifying Exposure and Contrast in the Image Display
- Enabling Aspect Ratio Display in the Player
- Changing Playback Scan Mode Options in the Player
- Displaying a Clip in the Broadcast Monitor
- Configuring a Dual Monitor Setup
- Playing Back with Proxies
- Color and Light Levels
- Changing Playback Scan Mode Options
- Enabling the Aspect Ratio Display
- Setting up the Image Display Viewer in the Tools
- Monitoring Dual Timecodes and Pulldown
- Displaying the Reference Area
- Displaying Multiple Views
- Playback
- Editing Clips and Sequences
- Inserting a Clip on the Timeline
- Overwriting a Clip on the Timeline
- Replacing a Clip on the Timeline
- Other Editing Operations
- Timeline Editing Settings
- Trimming Clips
- About Timeline Tracks and Versions
- About Timeline Patching
- Navigating and Searching the Timeline
- Using Markers on the Timeline
- About Timeline Containers
- About Timeline Gaps
- Playing the Timeline
- Cutting Clips on the Timeline
- Swapping Timeline Elements
- Removing Elements From the Timeline
- Matching Clips with Their Sources
- Grouping and Syncing Elements on the Timeline
- Timeline Reference
- Audio
- Accessing the Audio Desk
- Importing Audio Files
- Monitoring Audio in ConnectFX
- Adding an Audio Effect on a Segment
- Adjusting the Audio Levels on Part of an Audio Segment
- Cross-fading Two Audio Segments Together
- Fading Audio Into or Out of a Clip
- Scaling the Size of the Waveform
- Displaying Audio Waveforms
- Muting Audio Tracks
- Mapping Audio Tracks to Audio Desk Input Strips
- Converting Audio from Stereo to Mono or Mono to Stereo
- Rendering
- Timeline FX and Transitions
- Working with Timeline FX
- Working with Timeline Transitions
- Working with Timeline FX and Transition Presets
- Navigating Timeline FX and Transitions
- Adding Timeline FX to Gaps
- Working With Clip Format and Import Options on the Timeline
- 2D Compositing on the Timeline
- Adding Matte Containers
- Working with Mattes and Masks on the Timeline
- Compositing in 3D Space on the Timeline Using Action
- Keying on the Timeline
- Creating New Sources Using Tools from the Tools Tab
- Procedural Compositing with ConnectFX
- Creating ConnectFX
- About the ConnectFX Process Tree
- Adding and Connecting Nodes to the Process Tree
- Working with Clips in the Process Tree
- Adding Media to an Action Node
- Viewing Nodes in Context
- About CFX Output Nodes
- Saving and Loading ConnectFX Setups
- Using a Create CFX Clip for Caching or Versioning
- Using the Timing View to Offset Clips
- Caching Frames
- Grouping Nodes
- Mimicking, Copying, and Duplicating Nodes
- Customizing the ConnectFX Tools Bin
- Creating Custom Nodes
- ConnectFX Preferences
- Compositing in 3D Space with Action
- About Action
- Action Media
- Action Axes
- Action Surfaces
- Stereoscopic Workflow in Action
- Action Perspective Grid
- Action Lights and Lighting Effects
- Action 3D Geometry
- Action 3D Text
- Action Shading and Textures
- Action 3D Paths
- Action Cameras
- Action 3D Cameras
- Action Analyzer
- Action Source Nodes
- Chroma Keying and Working with Green Screens
- Setting Up the Nodes and Media to Pull a Key
- Setting Up Viewports for Keying
- Using Blend Nodes
- Creating and Refining a Key in the Master Keyer
- Creating a Key by Extracting a Single Colour with the Channel Keyer
- Creating a Key by Extracting a Range of Colours with the HLS, YUV, RGB and RGBCMYL Keyers
- Creating a Key by Setting the Luminance
- Refining Your Key
- Resetting Your Key
- Rendering Your Key
- Stabilizing and Tracking
- Accessing the Stabilizer
- How the Stabilizer Works
- Working with Trackers
- Selecting a Stabilizer Method
- Smoothing Out Camera Motion
- One-Point and Two-Point Axis Tracking
- Bilinear Surface Tracking
- Offsetting the Tracking Motion of the Reference
- Adjusting the Surface With the User Shape Channel
- Tracking Difficult Shots and Correcting Errors
- Adjusting the Size of the Tracker Box
- Positioning the Tracker Box Manually During Analysis
- Locking Keyframes in Place
- Changing the Reference Point
- Finding the Best Tolerance Value
- Analyzing Backward
- Manually Tracking a Pattern that Disappears
- Analyzing One Frame at a Time
- Editing the Stabilizer Channels on the Image
- Tracking a Degraded Copy of the Clip
- Changing the Colour of Trackers
- Pretracking a Clip
- Copying Shift Channels
- Importing and Exporting Data
- Masking and Rotoscoping
- GMask
- Accessing the Garbage Mask Menu
- About Garbage Mask Options
- Setting Mask Options
- About Drawing Options
- Drawing a Mask
- Adjusting the Number of Points in Freehand Segments
- Garbage Mask Nodes
- Changing the Priority Order of Masks
- Transforming the Mask
- Manipulating Vertices and Tangents
- Animating Garbage Masks
- Applying Motion Blur to Garbage Masks
- Blurring a Stationary Garbage Mask
- Rendering Garbage Masks in Interlaced Mode
- Using Multiple Garbage Masks
- Refining the Mask
- Using Region of Interest and the Tracer
- Saving Garbage Mask Setups
- Loading Garbage Mask Setups
- Preset Garbage Mask Setups
- Importing and Exporting Raw Setup Files
- Creating Customized Wipes with Garbage Masks
- GMask
- Colour Correcting
- About Colour Correcting
- About the Colour Warper
- Accessing the Colour Warper
- Setting Up Your Work Environment
- Sampling Clips in the Image Window
- Selecting Colour Ranges for Colour Correction
- Correcting Colour Imbalances
- Improving Contrast
- Matching Colours in Clips
- Performing Hue Shifts
- Creating Colour Casts
- Readjusting Colour After a Colour Correction
- Removing Colour Spill
- Creating Subsetups
- Painting
- Paint Node
- Accessing the Paint Node
- Using Sources
- Brush Attributes and Attribute Modes
- Painting Brush Strokes
- Using Paint Modes
- Revealing Sources
- Drawing Shapes
- Drawing Selections
- Copying, Pasting, and Deleting Shapes, Selections, and Strokes
- Clear shapes strokes and selections from a layer
- Erasing Shapes and Strokes
- Using Blending Modes
- Using the Canvas
- Previewing a Reveal Operation Using a Reference Image
- Saving Setups and Preferences
- Paint Node Keyboard Shortcuts
- Paint Tool
- Loading Clips into Paint
- Locking and Unlocking the Duration of a Clip
- Using the Mouse
- Displaying a Reference Image
- Using Overlays
- Selecting Colours
- Previewing an Animation
- Painting on Full-Resolution Film Images
- Saving and Restoring the Image
- About Canvas Mode
- About Brush Attributes and Modes
- Applying Filters
- Using Special Effects Media
- Wiping an Image
- Filling an Image
- Using AutoPaint
- About Mattes
- Using Graphics in Paint
- Accessing the Graphics Menu
- Creating Graphics
- Using the Object Tools
- Selecting Objects
- Editing Objects
- Setting the Object Resolution and Display
- Setting the Object Attribute
- Changing the Object's Appearance
- Changing the Size or Position of an Object
- Changing the Shape of an Object
- Converting Graphics to AutoPaint Strokes
- Animating Graphics
- Saving and Restoring Objects
- Tacking Down Objects
- Cutting and Pasting in Paint
- About Paint Setups
- Paint Node
- Text and Titling
- Using Shaders to Create Your Own Effects
- Effects and Tools Reference
- 2D Histogram
- 2D Transform
- Auto Matte
- Auto Stabilize
- Average
- Blend and Comp
- Blur
- Bump Displace
- Burn-in Letterbox
- Burn-in Metadata
- Clamp
- Colour Corrector
- Colour Curves
- Color Warper
- Colour Source
- Combine
- Comp
- Compound
- Damage
- Deal
- Deform
- Degrain
- Deinterlace
- Denoise
- Depth of Field
- Difference Matte
- Edge Detect
- Field Merge
- Filter
- Flip
- Garbage Mask
- Glow
- Gradient
- Interlace
- Keyer Channel
- Keyer HLS
- Keyer Luma
- Keyer RGB
- Keyer RGBCMYL
- Keyer YUV
- LUT Editor
- Map Convert
- Master Keyer
- Matte Curves
- Matte Edge
- Mono
- Motif
- Motion Analysis
- Motion Blur
- MUX
- Optics
- Paint Node
- Pixel Spread
- Proxy Extract
- Proxy Regeneration
- Pulldown
- Recursive Ops
- Regrain
- Resize
- Sparks
- Stabilizer
- Stereo Filter
- Stereo Toolbox
- Stylize
- Text
- Timewarp
- Animating Keyframes
- Keyframe Indicator Reference
- Animating Keyframes in the Animation Channel Editor
- Panning and Zooming in the Animation Channel Editor
- Adding Keyframes to Channels in the Animation Channel Editor
- Changing Keyframe Values in the Animation Channel Editor
- Copying and Pasting Channels or Keyframes in the Animation Channel Editor
- Changing the Duration of an Animation in the Animation Channel Editor
- Changing the Values of Keyframes Proportionally in the Animation Channel Editor
- Offsetting Select Keyframes or Channels in the Animation Channel Editor
- Simplifying the Number of Keyframes in the Animation Channel Editor
- Baking Keyframes
- Swapping Animation Curves
- Flipping Channels and Keyframes
- Removing Jitter from an Animation Curve
- Applying an Average
- Modifying Tangents to Reshape the Animation Curve
- Setting Display Preferences in the Animation Channel Editor
- Using Selection Sets to Control the Channels and Folders You Want to Display
- Generating Keyframes Based on Audio Analysis
- Animation Menu Settings
- Advanced Animation: About Expressions
- Colour Management
- Colour Management Workflow
- Applying Colour Management to Clips
- Applying Colour Management to Displayed Images
- Configuring Smoke to Use LUTs and Colour Transforms for Display
- Configuring the Colour Transform Aliases
- Applying 1D LUTs to the Monitor
- Applying 3D LUTs and Colour Transforms to Viewports
- Applying a 3D LUT or Colour Transform to the Projector or Broadcast Monitor
- Modifying Exposure and Contrast with Display Transforms
- Controlling the Look in Viewports
- Colour Management Files and Locations
- Autodesk Color Management
- About Autodesk Color Management
- Color Management Concepts
- Common Color Management Scenarios
- Color Managing Images on Input
- Color Managing Images for Display
- Color Managing Images for Output
- Color Managing Images from Scanned Film
- Color Managing Digital Cinema Camera Footage
- Color Managing Video Footage
- Color Managing Rendered 3D CG Images
- Color Managing Matte Paintings
- Color Managing Textures and Maps
- Color Management and Image-based Lighting (IBL)
- White Point Conversion
- Using Diagnostic Color Transforms
- Converting Images Between 12i or 16i and 16f Encodings
- Custom Color Transforms
- A Complex Color Management Example
- Color Transform Files
- Autodesk CTF File Format Version 1.3
- SynColor Configuration File
- Artist Control Surfaces
- Smoke Keyboard Shortcuts
- Setting Smoke Preferences
- Open Clip Description
- Index
Subdividing an Extended Bicubic
Subdivide the bicubic surface up to eight times to increase the number of vertices and tangents. Then translate
the vertices for a smaller region of the image for more precision. You should warp the surface with a small
number of subdivisions to obtain the best results. After applying some deformations to a large portion of
the surface, subdivide the surface further and perform deformations on a more localized region of the surface.
To subdivide extended bicubics:
1 From the Vertices menu, click Subdivide.
You can click the subdivide button up to eight times to further subdivide the surface. Click Merge to
undo subdivide operations.
2 Transform the tangents to achieve the effect you want.
To move the reference point:
1 Select the reference point.
The reference point turns red when selected.
2 Drag the reference point to a new location, or use the X, Y and Z vertex fields to assign a new coordinate
for the reference point.
To rotate multiple surface points:
1 Set the reference point values you want to use as the axis of origin using the X, Y, Z Vertex Position
fields.
2 Select multiple surface points by pressing Ctrl and dragging to select the surface points.
3 From the Tools box, select Rotate.
A 3D trackball appears on the reference point.
4 Use the 3D trackball to rotate the reference point and selected points.
All selected points rotate around the reference point.
To scale multiple surface points:
1 Set the reference point values you want to use as the axis of origin using the X, Y, Z Vertex Position
fields.
2 Select multiple surface points by pressing Ctrl and dragging to select the surface points.
3 From the Tools box, select Scale.
4 Drag in a direction in the image window to scale accordingly.
About Transforming Multiple Points
Use the magnet to transform a range of extended bicubic points. Use the magnet when there are many
surface points as a result of more than one subdivision. In the Vertices or UV Points menu, the magnet
controls include the Magnet button, the Magnet Transformation box, and the Magnet Curve Editor.
516 | Chapter 15 Compositing in 3D Space with Action