
2010
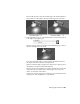


Table Of Contents
- Contents
- Overview
- Maya Basics
- Polygonal Modeling
- Introduction
- Preparing for the lesson
- Lesson 1: Modeling a polygonal mesh
- Introduction
- Setting modeling preferences
- Using 2D reference images
- Creating a polygon primitive
- Modeling in shaded mode
- Model symmetry
- Selecting components by painting
- Selecting edge loops
- Editing components in the orthographic views
- Editing components in the perspective view
- Drawing a polygon
- Extruding polygon components
- Bridging between edges
- Adding polygons to a mesh
- Splitting polygon faces
- Terminating edge loops
- Deleting construction history
- Mirror copying a mesh
- Working with a smoothed mesh
- Creasing and hardening edges on a mesh
- Beyond the lesson
- Lesson 2: Sculpting a polygon mesh
- NURBS Modeling
- Subdivision Surfaces
- Animation
- Introduction
- Preparing for the lessons
- Lesson 1: Keyframes and the Graph Editor
- Lesson 2: Set Driven Key
- Lesson 3: Path animation
- Lesson 4: Nonlinear animation with Trax
- Introduction
- Open the first scene for the lesson
- Creating clips with Trax
- Changing the position of clips with Trax
- Editing the animation of clips
- Reusing clips within Trax
- Soloing and muting tracks
- Scaling clips within Trax
- Open the second scene for the lesson
- Creating clips from motion capture data
- Extending the length of motion capture data
- Redirecting the motion within a clip
- Beyond the lesson
- Lesson 5: Inverse kinematics
- Introduction
- Open the scene for the lesson
- Understanding hierarchies
- Viewing hierarchies using the Hypergraph
- Creating a skeleton hierarchy
- Parenting a model into a skeleton hierarchy
- Applying IK to a skeleton hierarchy
- Creating a control object for an IK system
- Constraining an IK system
- Limiting the range of motion of an IK system
- Simplifying the display of a hierarchy
- Applying parent constraints on an IK system
- Planning an animation for an IK system
- Animating an IK system
- Beyond the lesson
- Character Setup
- Polygon Texturing
- Rendering
- Introduction
- Preparing for the lessons
- Lesson 1: Rendering a scene
- Introduction
- Open the scene for the lesson
- Creating shading materials for objects
- Refining shading materials for objects
- Maya renderers
- Rendering a single frame using IPR
- Rendering using the Maya software renderer
- Batch rendering a sequence of animation frames
- Viewing a sequence of rendered frames
- Beyond the lesson
- Lesson 2: Shading surfaces
- Lesson 3: Lights, shadows, and cameras
- Lesson 4: Global Illumination
- Lesson 5: Caustics
- Dynamics
- Painting
- Introduction
- Preparing for the lessons
- Lesson 1: Painting in 2D using Paint Effects
- Lesson 2: Painting in 3D using Paint Effects
- Introduction
- Preparing for the lessons
- Brushes and strokes
- Rendering Paint Effects strokes
- Paint Effects on 3D objects
- Creating a surface to paint on
- Painting on objects
- Using turbulence with brush stroke tubes
- Using additional preset brushes
- Mesh brushes
- Converting mesh strokes to polygons
- Modifying a converted polygonal mesh
- Beyond the lesson
- Lesson 3: Painting textures on surfaces
- Expressions
- Scripting in Maya
- Assets
- Hair
- Fluid Effects
- Fur
- Introduction
- Preparing for the lessons
- Lesson 1: Assigning a fur description
- Introduction
- Lesson setup
- Duplicating objects across an axis of symmetry
- Renaming surfaces on a model
- Assigning objects to a reference layer
- Assigning a fur description preset to a model
- Reversing surface normals
- Modifying the fur direction
- Painting fur attributes
- Modifying the color of a fur description
- Creating a new fur description
- Beyond the lesson
- Lesson 2: Rendering fur
- nCloth
- Introduction
- Preparing for the lessons
- Lesson 1: Creating nCloth collisions
- Lesson 2: Creating nCloth constraints
- Lesson 3: Creating nCloth Clothing
- Introduction
- Lesson setup
- Making the dress into an nCloth object
- Making the character wear the dress
- Caching nCloth to speed up playback
- Adjusting the fit of the dress
- Defining the behavior of nCloth clothing
- Painting nCloth properties
- Open the second scene for the lesson
- Setting the initial state
- Constraining nCloth clothing
- Improving the quality of the nCloth simulation
- Smoothing nCloth clothing
- Beyond the lesson
- nParticles
- Introduction
- Preparing for the tutorials
- Lesson 1: Creating nParticles
- Lesson 2: Creating a smoke simulation with nParticles
- Lesson 3: Creating a liquid simulation with nParticles
- Introduction
- Lesson setup
- Creating a Water style nParticle object
- Adjusting Liquid Simulation attributes
- Adding fluidity to the nParticles
- Open the second scene for the lesson
- Convert nParticles to a polygon mesh
- Cache your nParticle simulation
- Adding Motion Streak
- Open the third scene for the lesson
- Render your liquid simulation
- Assigning material shaders
- Rendering a simulated frame
- Beyond the lesson
- Live
- Index

If you are intent on perfecting shadows in your future projects, try various
combinations of values for Resolution and Filter Size. For this lesson, the
default values are satisfactory because the shadow edge has minimal
contrast. If you create shadows with sharp contrast at the edges, altering
the default values will be more desirable.
Creating additional cameras in a scene
Elsewhere in this book, you’ve used the default perspective camera to examine
and render your modeling and animation work in progress. In some situations,
it is convenient to create and use additional cameras.
For example, you might want to render the scene from two different camera
views to compare the results. Alternatively, you might want to use the default
camera for interactive modeling and animation and the second camera strictly
for rendering the scene. In the next steps, you create an additional camera
and manipulate its view of the scene.
To create a second camera for the scene
1 Select Create > Cameras > Camera. This creates a perspective camera with
an icon representing it at the center of the grid.
2 In the Channel Box, change the name of the camera to myCamera.
Even though you’ve created a new camera, you are still looking at the
scene through the default perspective camera named persp. You will view
the scene through myCamera after you position it in the next step. If
you were to view the scene through myCamera now, you would see a
disorienting view of the back wall and floor. The camera’s icon points in
the direction of the camera’s view.
The scene’s default persp camera has no icon. An icon is displayed only
for a camera you create.
3 Use the Show Manipulator Tool (select Modify > Transformation Tools
> Show Manipulator Tool) to position myCamera roughly in this position:
496 | Chapter 9 Rendering