
2009


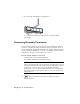


Table Of Contents
- Contents
- Stress Analysis
- 1 Get Started With Stress Analysis
- 2 Analyze Models
- 3 View Results
- 4 Revise Models and Stress Analyses
- 5 Generate Reports
- 6 Manage Stress Analysis Files
- Simulation
- Index

Notice that the joint type (Cylindrical) is listed in the Joint field and the
animation switches to the Cylindrical Joint animation. Autodesk Inventor
Simulation Simulation automatically selects the appropriate joint needed
for the constraint conversion.
5 Remove the check mark next to Mate:1 (door:1, pillar:1), and then select
the check box next to Mate2: (door:1, pillar:1) (the face-to-face constraint).
Taken by itself, the face-to-face constraint converts to a planar joint.
6 Select the check box next to Mate1: (door:1, pillar:1).
7 Ensure the check boxes for both constraints are selected.
When taken together, Autodesk Inventor Simulation Simulation infers
that the two constraint types convert to a revolution joint. Taken together,
the two mate constraints function like an insert constraint which
functions like a revolution joint.
8 On the Convert Assembly Constraints dialog box, click OK.
Notice that the new joint was added to the browser under the Standard
Joints node. In addition, the Mobile Groups node appears and the door
component is moved from the Grounded group to the Mobile group.
Defining Forces
To test these joints and see a rudimentary simulation, define the first force.
Define gravity
1 In the browser, right-click Gravity (under External Loads), and then select
Define Gravity.
TIP Alternately, you can double-click the Gravity node.
2 On the Gravity dialog box, deselect Suppress.
3 Ensure Entity is checked.
4 Select the Entity Selection arrow to select the part edge to set a vector for
gravity.
54 | Chapter 8 Simulate Motion