
2009


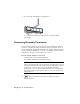


Table Of Contents
- Contents
- Stress Analysis
- 1 Get Started With Stress Analysis
- 2 Analyze Models
- 3 View Results
- 4 Revise Models and Stress Analyses
- 5 Generate Reports
- 6 Manage Stress Analysis Files
- Simulation
- Index

The Dynamic Simulation browser turns gray and the status slider on the
simulation panel moves, indicating that a simulation is running.
Since we have not created any joints (and have not specified any driving
forces) the assembly is grounded and does not move.
3 If the status slider is still moving, click the Stop button.
Even though the simulation is not running, the simulation mode is still
active.
4 Attempt to drag the Door component. It does not move.
5 On the Dynamic Simulation panel bar, click Activate Construction
Mode at the bottom of the browser.
It exits the simulation mode and returns to the Dynamic Simulation
construction mode. In construction mode, you perform such tasks as
creating joints and applying loads.
Automatically convert assembly constraints
1 On the Dynamic Simulation panel bar, click Dynamic Simulation Settings.
This dialog box now has the Automatically Convert Constraints to
Standard Joints option, which automatically translates certain assembly
constraints to standard joints.
When you open an assembly created in Autodesk Inventor Simulation
2009, Automatically Convert Constraints to Standard Joints is selected
by default. However, since this assembly was created in an earlier version
of Inventor, the default is not selected.
2 On the Dynamic Simulation Settings dialog box, click Automatically
Convert Constraints to Standard Joints.
3 Click Apply.
One welded group and five standard joints are created.
4 In the Dynamic Simulation browser, navigate to the Mobile Groups folder,
and then open the Welded group folder. Notice the two parts that the
software has welded as one step of translating assembly constraints.
5 In the Standard Joints folder, notice the standard joints that the software
has automatically created for you.
Converting Assembly Constraints | 51