
Quick Start


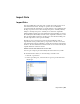


Table Of Contents
- GettingStarted_withCover.pdf
- Getting Started Inventor Fusion TP2
- Contents
- Autodesk Inventor Fusion TP2
- What is new in TP2?
- Working with Inventor Fusion User Interface
- The Ribbon
- Glyphs and Manipulators
- Marking Menu
- Selection commands
- Enhanced tooltip
- Browser and Copy/Paste
- Function Key Behavior
- Triad
- Measure
- Menu and Command Access
- Other commands in the Application Window
- Create 3D Models
- Create a Single Body
- Create Multiple Bodies
- Modify a Body
- Sketch
- Starting a Sketch
- The Sketch Plane
- The Sketch Grid
- Line/Arc Segment Creation
- Spline Creation
- Circle Creation
- Circular Arc Creation
- Rectangle Creation
- Ellipse Creation
- Polygon Creation
- Project Geometry
- Trim/Extend
- Sketch Fillet
- Sketch Inferencing
- Sketch Constraints
- Stopping a Sketch
- Sketch Profiles
- Editing a Sketch Entity
- Locking Sketch Geometry
- Features
- Find Features
- Dimensions and Body Constraints
- Error Handling
- Work Geometry
- Working with Multiple Components
- Dimensions as Annotations
- User Tags
- Import Data
- Export Data
- Materials and Model Appearance
- Modeling Paradigms
- System Requirements
- Index

■ There are no formatting or style mechanisms, other than the precision.
Note: The context menu always uses the active selection in preference to the
merely highlighted. So if you have a dimension selected, and then hover over
a different non-selected dimension, and click right, it will tell you the
lock-status of the selected dimension, and not the dimension under the mouse.
User Tags
Tags can be added to any face or body. These tags can then be used for
searching/locating particular entities.
These user-defined tags are called User Tags. A user tag consists of a tag name
and an optional tag value. Inventor Fusion also supports Feature Tags. Feature
Tags are predefined properties of features such as Fillet Radius or Hole Dia.
Add User Tag
The Add User Tag command sets the tag name and value for the selected
entities. The command is accessed in the Ribbon.
Use the user tag dialog box to assign user tags. The dialog box can be expanded
using the button.
To assign a user tag, start the command, select the objects, then enter the tag
name and value. You can select multiple objects to assign the same tag to the
objects.
There are two ways to set the tag name and value.
■ Enter the tag name and value separated by a comma in the Keyword field.
210 | Chapter 1 Autodesk Inventor Fusion TP2