
Technical data


Transitioning a Roadway
79
Transitioning a Roadway
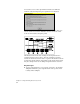
To transition a road, you can create plan and profile transition regions
on your finished roadway design. For example, if your highway design
includes a passing lane on a hill, you can add the additional lane to
the plan view of the roadway, define the edge of pavement as a
transition alignment, and then update the cross sections using the
Edit Design Control command.
You can also design vertical alignments in the profile view that
represent vertical transitions, subgrade surfaces, or ditch elevations,
and then you can attach these vertical alignments to the cross
sections, updating them with the new elevations.
Key Concepts
■
In order to create transition regions, you need to define transition
control points on the template using the Edit Template command.
■
You can create horizontal and vertical transition alignments to
attach to the cross sections.
■
You can use commands in the Cross Sections
➤
Ditch/Transition
menu to define plan and profile transition alignments. However,
you can also use commands in the Alignments and Profiles menus
to define and edit these transition alignments.
■
If you make changes to the transition alignments using the
View/Edit Sections command or the Edit Design Control command,
then you can use the Cross Sections
➤
Ditch/Transition
➤
Import
commands to import these transition alignments back into the
plan or profile views.
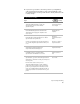
To transition a roadway
Steps
Use
to look up
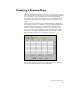
1 Draw and define the finished ground template.
For more information, see “Creating Finished
Ground Cross Sections” in this chapter.
Overview of Defining
Templates
2 From the Cross Sections menu, choose
Templates
➤
Edit Template to place transition
points on the template.
Define the Transition
Regions on a Template
NOTE
The transition control locations are saved
with the template and can be used from
one project to the next.