
Technical data

Chapter 7 Designing Pipe Runs
100
Key Concepts
■
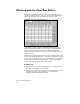
You can specify pipe label position, pipe line type, and line text
using the Plan Pipe Drafting settings. You can choose which label
components to display. You can append prefixes and suffixes to
pipe size, slope, material, name, and length labels. You can also
specify the precision for size, slope, and length values, and you can
add arrows to indicate flow direction.
■
You can select node label station, offset, elevation, and name labels
in the Plan Node Drafting settings. You can choose to display any
of the label components. You can append prefixes and suffixes to
node station, right or left offset, and pipe, inverts in and out, sump,
and rim elevation labels. You can also specify the precision for
station, offset, and pipe, sump, and rim elevation values.
■
You can specify the layers for the finished plan pipe run labels.
■
You can specify structure label locations by picking points or by
entering an offset distance relative to each structure.
■
You can rotate structures as they are inserted.
■
To properly label pipe runs with the Sheet Manager commands,
you must plot the Finished Draft plan view of the pipes (although
you do not need to include any textual information such as pipe
diameter or invert elevations).
To draft a finished plan pipe run
Steps
Use
to look up
1 From the Pipes menu, choose Settings
➤
Edit to
display the Pipes Settings Editor dialog box.
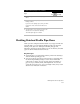
2 Under Pipes Drafting Labels, click Plan to establish
the finished plan pipe settings.
Change the Label Settings
for Finished Draft Pipes in
Plan View
3 Under Node Drafting Labels, click Node to
establish the finished plan node settings.
Change the Label Settings
for Finished Draft Nodes in
Plan View
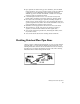
4 From the Pipes menu, choose Finish Draft
Plan
➤
Draw Pipes, and then select the pipe run.
You can select the pipe run from the drawing by
clicking on it, or you can press ENTER to display
the Defined Runs dialog box where you can select
the run.
Create Finished Draft Runs
in Plan View