
Technical data

Working in Model Space and Layout Mode
141
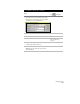
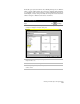
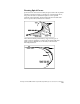
To create an irregular viewport in paper space
Steps
Use
to look up
1
To change to a layout in paper space, click a
layout tab or click MODEL on the status bar.
Switching Between Model
Space and Paper Space
2
From the View menu, choose
Viewports ➤ Polygonal Viewport.
Creating a New Viewport
with Irregular Boundaries
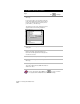
3
Draw the viewport shape on the layout. You
can use straight line segments or curves to
draw the viewport.
4
Type Close to join the last segment of the
viewport boundary with the viewport start point.
5
Model space is regenerated and the drawing
objects become visible in the layout viewport.
For more information, use to look up “Working with Layouts
”
in
the online Help.
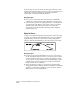
Controlling the Display in Floating Viewports
After you create floating viewports in the paper space layout, you can
control the visibility of objects in the viewports in several ways. For
example, you can freeze and thaw layers, hide lines, and use different
views of the drawing, such as different magnification, orientations, or
viewpoints.
After you create a floating viewport on the drawing sheet you can
move it, resize it, and overlap it with other viewports. You can use a
view of tiled viewports within one floating viewport, and then arrange
it with other viewports on the layout page.
Key Concepts
■
You can edit the contents of the floating viewport by returning to
model space. To do this, click PAPER on the status bar. For more
information, see “Switching to Model Space” in the online Help.
■
Objects that are created in paper space, for example, a border, are
visible only in paper space and cannot be edited in model space.