
Installation guide
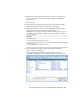
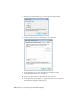
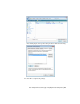

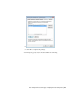
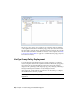


Table Of Contents
- Contents
- Stand-Alone Installation
- Migrating and Customizing
- Migrate Custom Settings and Files from Previous Releases
- Customize AutoCAD with Initial Setup
- Export and Import Custom Settings from the Same Release
- Migrating and Customizing Issues
- What are the benefits of identifying my industry?
- How is this information being used?
- What happens if I skip or cancel Initial Setup?
- What are the benefits of selecting task-based tools?
- What is a workspace?
- How do I make changes to a workspace at a later time?
- What is a drawing template file?
- How do I modify drawing templates at a later time?
- What are the benefits of customizing AutoCAD?
- Network Administration and Deployment
- Preparing a Deployment
- Setting Up and Creating a Deployment
- Prepare for a Network Deployment
- Configure Individual Products
- Your Deployment Choices
- Enter User and Product Information
- Creating Log Files
- What Is Silent Mode?
- Select a License Type (Optional)
- Select the Installation Type (Optional)
- Select Installation Folders for Support Content
- Define Search Paths and File Locations (Optional)
- Install Additional Files (Optional)
- Specify User Preferences (Optional)
- Include Service Packs (Optional)
- Configure InfoCenter Communication Center (Optional)
- Allow Users to Access Online Resources (Optional)
- Create a Default Deployment
- Create a Custom Deployment
- Modify a Deployment (Optional)
- Point Users to the Administrative Image
- Distributing an Autodesk Program
- Troubleshooting
- General Installation Issues
- How can I check my graphics card driver to see if it needs to be updated?
- What is the text editor used for?
- What is the difference between a stand-alone license and a network license?
- What is the benefit of using a network licensed version of the software?
- What features get installed during a Typical or Custom installation?
- How do I access my product documentation?
- What is SAMreport-Lite?
- Deployment Issues
- Is there a checklist I can refer to when performing a deployment?
- Where should deployments be located?
- What are the default search paths and file location settings?
- How will changing the support file locations affect my search paths?
- Along with defining search paths and file location, can files be added?
- Where can I check if service packs are available for my software?
- How do I extract an MSP file?
- Can Online Resource settings be modified later?
- Where can I learn about InfoCenter?
- What are information channels?
- What are the benefits to enabling CAD Manager Channels?
- What are RSS feeds and how do they benefit my installation?
- Where can I learn about InfoCenter search locations?
- How do I set or customize search locations?
- Networking Issues
- When installing tools and utilities, which selections are applicable for a multi-seat stand-alone installation?
- When installing tools and utilities, which selections are applicable for a stand-alone installation?
- Where do I find my server name?
- When specifying user workstation settings, I am given the option to specify a profile. What are profiles?
- Can I create custom desktop shortcuts?
- What happens when you choose to append or merge service packs?
- What is an administrative image (MSI) file?
- What is the impact of selecting all products for the administrative image, and can I add products later?
- Uninstall and Maintenance Issues
- When adding or removing features, how can I tell what features get installed by default?
- Is it possible to change the installation folder when adding or removing features?
- When should I reinstall the product instead of a repair?
- Do I need my original disc(s) to reinstall my product?
- After repairing my installation, is it possible to recover my settings?
- When I uninstall my software, what files are left on my system?
- General Installation Issues
- Glossary
- Index

To create a software installation package using SCCM
1 Click Start menu ➤ Programs or All Programs ➤ Microsoft System
Center ➤ Configuration Manager 2007 ➤ ConfigMgr Console.
2 In the Configuration Manager Console window, expand Software
Distribution.
3 Right-click Packages ➤ Distribute ➤ Software.
4 In the Distribute Software wizard, click Next.
5 In the Package dialog box, select Create a New Package and Program
without a Definition File. Click Next.
6 In the Package Identification dialog box, enter the information for Name,
Version, Publisher, Language and any comments. Click Next.
7 In the Source Files dialog box, make selections to where SCCM retrieves
the files and how it manages them. Click Next.
NOTE In this procedure, “Always Obtain Files from a Source Directory” was
selected.
8 In the Source Directory dialog box, specify the directory where the source
files are stored. Click Next.
9 In the Distribution Points dialog box, select the distribution point(s).
This is the location from which the software package will be deployed to
the target systems. Click Next.
10 In the Program Identification dialog box, enter the name of your program.
This is the name that displays in Add or Remove Programs in the Control
Panel. In the Command Line field, enter AdminImage\setup.exe /W /Q
/I AdminImage\<deployment name>.ini /Lang en-US. In this case, our
deployment is named AutoCAD 2011, so you would enter
AdminImage\setup.exe /W /Q /I AdminImage\AutoCAD 2011.ini /Lang
en-US. Click Next.
NOTE The example above assumes the language pack you wish to install is
US English. /W is the flag for SMS and SCCM, /Q is the silent install, /I
indicates this is a deployment installation.
11 In the Program Properties dialog box, Program Can Run drop-down list,
select how you want your program to install. Your choices are:
■ Only When a User is Logged On
Create the SCCM Software Installation Package | 91