
Technical data

Reusing Your Existing 2D Design Data
64
Designing a Rib
To create a rib feature using the shared sketch geometry:
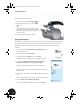
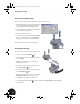
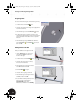
1. On the Panel bar, click the Rib tool.
2. Select the line shown in the image to the right (the line
lies in front of the rim).
3. In the Rib dialog box, click the Direction button.
4. To define the direction of the rib, move the cursor
around the profile until the green arrow in the preview
points toward the rim and then click to accept that
direction.
5. In the Rib dialog box, type 6 mm for the thickness,
click the Centered and To Next options, and
then click OK.
Adding Fillets to the Rib
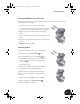
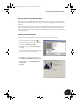
Next you add fillets to the edges of the rib.
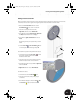
1. Use the Rotate tool to rotate your
view of the part similar to the view
shown on the right.
2. On the Panel bar, click the Fillet tool.
3. Select the two short edges on the top
face at each end of the rib.
4. In the Rib dialog box, change the radius
to 10 mm and then click OK.
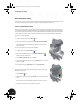
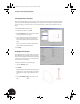
5. Click the Fillet tool again.
6. Select the two long edges of the rib.
7. In the Rib dialog box, change the radius
to 1 mm, and then click OK.
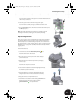
8. To turn off the visibility of the imported
sketch geometry, in the Browser,
right-click AM_1 (just above
Revolution1) and then choose Visibility.
INV8_TD_Book5.book Page 64 Tuesday, October 28, 2003 10:51 AM