
Technical data


Reusing Your Existing 2D Design Data
62
Selecting the Layers to Import
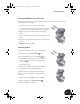
Now you can identify which layers or geometry you want to import. The left side of the dialog box displays the
layers that exist in the drawing file. Even though you can import the entire drawing, you may want to import
only the contents you need. In this case, you need to import only the contours for the hub, which is on layer
AM_1.
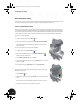
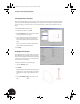
In the AutoCAD OEM Viewer dialog box:
1. Ensure the Units of File is set to mm.
2. Click the white box button to the right of the units to
set the background color to white.
3. In the Selective import area, clear the check mark
next to all the layers except the last layer, AM_1
(Layer AM_1 should be the only layer with a check
mark).
Notice as you select or deselect the layers, that the
preview window dynamically updates.
4. Click Next.
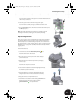
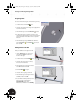
Defining the Destination
The 2D drawing data you are importing can be used in
many different ways. For example, you can import the
data into a new Autodesk Inventor drawing, a title block,
a symbol, and so forth. In this case, you want to import
the contents into a new 3D part.
In the Import Destination Options dialog box:
1. Select the New Part option.
2. Click Finish.
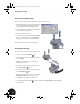
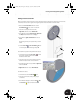
When Autodesk Inventor finishes importing the 2D
drawing data, a new part file will appear containing
all the data you need to create a 3D version of the
rim.
3. Use the Zoom Window tool to zoom in on the
data.
INV8_TD_Book5.book Page 62 Tuesday, October 28, 2003 10:51 AM