
Technical data

Animating the Assembly
60
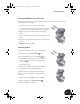
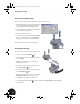
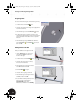
Repositioning the Upper Clamp
Next, you will move the bolts and the upper halfshell part in a different direction.
1. With the Tweak Components dialog box still displayed,
select the upper halfshell of the clamp (the bolts and
the upper halfshell should be highlighted in blue).
2. In the Tweak Components dialog box, click the X option
(or select the X arrow on the triad).
3. Drag the three parts to the left.
4. To define the exact distance of the tweak, type 65 mm
in the Component dialog box, click the green check
mark to accept that value, and then click Close.
The tweaks and trails of all three parts are displayed.
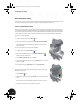
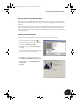
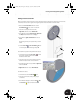
Animating the Assembly
You can now create an animation of the assembly process.
1. On the Panel bar, click the Animate tool.
2. In the Animation dialog box, type 10 for the interval and
then click Apply.
Note: The interval determines how many steps are
displayed for each tweak.
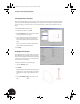
3. To watch an animation of how to assemble the parts,
click the Play Forward button.
4. To watch an animation of how to disassemble the parts,
click the Play Reverse button.
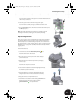
Tip: During playback of the animation, you can use the
Rotate, Pan, and Zoom tools to change your view.
5. Click Cancel to close the Animation dialog box.
6. On the Standard toolbar, click Save , save the presentation file as My_clamp.ipn, and then Close the
presentation file.
INV8_TD_Book5.book Page 60 Tuesday, October 28, 2003 10:51 AM