
Technical data


Getting Started
11
Starting Your First Assembly
First, you will create a new, empty assembly and then proceed to create or add components to that assembly
as the design progresses.
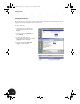
To create a new assembly using a standard template:
1. In the What to Do area of the Getting Started dialog box, click New.
Another dialog box presents several template options for single parts, sheet metal parts, assemblies,
drawings, and so forth.
2. Double-click the Standard.iam icon to create a new standard assembly.
Note: With Autodesk Inventor, you can create parts individually or in the context of an assembly. For the
purposes of this project, you will design your first part in the context of an assembly.
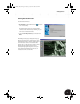
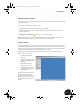
The User Interface
You now see the Autodesk Inventor user interface. The user interface may be familiar because it looks like a
standard Windows interface. At the top of the screen is the usual Windows menu bar, which includes a series of
menus. For example, on the File menu you will find tools like Open, Save, Print, and Exit. On the View menu,
you will find tools for model and view orientation like Rotate, Pan, and Zoom.
Below the menu bar is the Autodesk Inventor Standard toolbar. You can use the tools on this toolbar to
perform common tasks, including
• Performing file tasks (New,
Open, Save)
• Starting and finishing standard
design tools (Sketching, Return,
Updating)
• Dynamically viewing your
design (Rotate, Pan, Zoom)
• Controlling the appearance of
your designs (Shaded, Hidden
Edge, Wireframe)
The Autodesk Inventor user interface,
with the menu bar and Standard
toolbar, is shown on the right. On the
left side of the graphics area you see
the Panel bar (top) and the Browser
(bottom).
INV8_TD_Book5.book Page 11 Tuesday, October 28, 2003 10:51 AM