
Installation guide

1 Insert AutoCAD Civil 3D 2010 disc 1 into DVD-ROM drive.
2 In the AutoCAD Civil 3D Installation wizard, click Install Products.
3 Select the products you want to install. Click Next.
NOTE Autodesk Design Review 2010 is installed by default when you install
AutoCAD Civil 3D. It is recommended that you install Design Review if you
need to view DWF or DWFx files. For more information about Design Review,
see Installing Design Review on page 18.
4 Review the Autodesk software license agreement for your country or
region. You must accept this agreement to proceed with the installation.
Choose your country or region, click I Accept, and then click Next.
NOTE If you do not agree to the terms of the license and want to terminate
the installation, click Cancel.
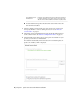
5 On the Products and User Information page, enter your serial number,
product key, and user information. Review the Privacy Policy from the link
at the bottom of the dialog box. After reviewing, click Next.
NOTE The information you enter here is permanent and is displayed in the
Help menu on your computer. Because you can't change this information
later without uninstalling the product, make sure you enter the correct
information.
6 On the Review - Configure - Install page, click Configure to make
configuration changes such as installation type, installing optional tools,
or changing the installation path.
7 On the Select the License Type page, you can choose to install a
Stand-alone or Network license. Click Next.
8 On the Select the Installation Type page, you can choose to make the
following configuration changes:
Installing AutoCAD Civil 3D | 9