
User`s guide


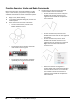

Table Of Contents
- Introduction
- Chapter 1: Taking the AutoCAD Tour
- Chapter 2: Creating Basic Drawings
- Chapter 3: Manipulating Objects
- Lesson: Selecting Objects in the Drawing
- Lesson: Changing an Object's Position
- Lesson: Creating New Objects from Existing Objects
- Lesson: Changing the Angle of an Object's Position
- Lesson: Creating a Mirror Image of Existing Objects
- Lesson: Creating Object Patterns
- Lesson: Changing an Object's Size
- Challenge Exercise: Grips
- Challenge Exercise: Architectural
- Challenge Exercise: Mechanical
- Chapter Summary
- Chapter 4: Drawing Organization and Inquiry Commands
- Chapter 5: Altering Objects
- Lesson: Trimming and Extending Objects to Defined Boundaries
- Lesson: Creating Parallel and Offset Geometry
- Lesson: Joining Objects
- Lesson: Breaking an Object into Two Objects
- Lesson: Applying a Radius Corner to Two Objects
- Lesson: Creating an Angled Corner Between Two Objects
- Lesson: Changing Part of an Object's Shape
- Challenge Exercise: Architectural
- Challenge Exercise: Mechanical
- Chapter Summary

Lesson: Creating Basic Objects ■ 85
Command Options
These Rectangle options are available after you have selected the first point for the rectangle. Right-
click to select from the shortcut menu or type the capitalized letter at the Command line.
Option
Description
Area
Use this option to create a rectangle based on its area and the distance of one side,
whether length or width.
Dimensions
Use this option to manually enter the length and width of the rectangle.
Rotation
Use this option to specify a rotation angle for the rectangle.
When you use the Distance or Area options to specify the rectangle size, the Length
prompt refers to the horizontal distance, while the Width prompt refers to the vertical
distance. If the rectangle is being rotated, Length refers to the distance along the rotation
angle, while Width refers to the distance perpendicular to the rotation angle.
Rectangle Command Guidelines
■ The Rectangle command generates polyline objects.
■ Because rectangles are polylines, selecting any segment selects the entire rectangle.
■ The simplest method for drawing a rectangle is to specify the first corner, then the opposite
corner using relative x,y coordinates. Example: after selecting the fist point, type @4,5 to make a
rectangle that is 4 x 5.
■ Rectangles can be initiated from any corner. After selecting the first point, if you type @-4,-5 you
will make a rectangle that is located below and to the left of the first point selected.
When using the dimension input option, you need to click to select an orientation.
After you enter the length and width values, move your cursor up and down or
left and right to view the available orientations. When the orientation you want is
displayed, click to create the rectangle.