
User`s guide
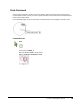
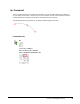
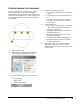
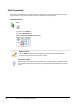
Table Of Contents
- Introduction
- Chapter 1: Taking the AutoCAD Tour
- Chapter 2: Creating Basic Drawings
- Chapter 3: Manipulating Objects
- Lesson: Selecting Objects in the Drawing
- Lesson: Changing an Object's Position
- Lesson: Creating New Objects from Existing Objects
- Lesson: Changing the Angle of an Object's Position
- Lesson: Creating a Mirror Image of Existing Objects
- Lesson: Creating Object Patterns
- Lesson: Changing an Object's Size
- Challenge Exercise: Grips
- Challenge Exercise: Architectural
- Challenge Exercise: Mechanical
- Chapter Summary
- Chapter 4: Drawing Organization and Inquiry Commands
- Chapter 5: Altering Objects
- Lesson: Trimming and Extending Objects to Defined Boundaries
- Lesson: Creating Parallel and Offset Geometry
- Lesson: Joining Objects
- Lesson: Breaking an Object into Two Objects
- Lesson: Applying a Radius Corner to Two Objects
- Lesson: Creating an Angled Corner Between Two Objects
- Lesson: Changing Part of an Object's Shape
- Challenge Exercise: Architectural
- Challenge Exercise: Mechanical
- Chapter Summary

72 ■ Chapter 2: Creating Basic Drawings
Practice Exercise: Circle Command
In this practice exercise, you use the Tan, Tan, Radius,
Circle command and the 2-Point Circle. First, you
draw two adjacent lines that are 5.25 units each.
1.
Begin a new drawing.
2.
In the Select template dialog box, select the
acad template file (dwt) and click Open.
3.
Be sure the following status bar settings are
on:
■ Polar tracking
■ Object snap
■ Object snap tracking
4.
To draw the lines:
■ Start the Line command.
■ For the start point, select the endpoint of
the line (1).
■ Drag the mouse down until the Polar angle
indicates that it is < 270. Enter 5.25 and
press ENTER.
■ Drag the mouse to the right until the Polar
angle indicates < 0. Enter 5.25 and press
ENTER.
■ Press ENTER to end the Line command.
5.
Adjust the display of your drawing using Zoom
or Pan Real-time, if necessary.
6.
To draw the smaller circle (3):
■ On the ribbon, click Home tab > Draw
panel > Circle drop-down > Tan, Tan,
Radius.
■ Move the cursor to the vertical line until
you see the Deferred Tangent object snap
and then click.
■ Now move the cursor to the horizontal line
until you see Deferred Tangent again and
click.
■ Specify the radius of the circle. Enter 2 and
press ENTER.
7.
To draw the larger circle (4):
■ On the Home tab, click Draw panel > Circle
drop-down > 2-Point.
■ Move the cursor to the end of the vertical
line (1) until you see the Endpoint object
snap and click.
■ Now move the cursor to the end of
the horizontal line (2) until you see the
Endpoint object snap and click.