
User`s guide
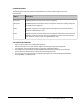
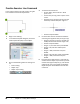
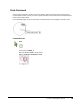
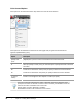
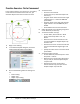
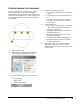
Table Of Contents
- Introduction
- Chapter 1: Taking the AutoCAD Tour
- Chapter 2: Creating Basic Drawings
- Chapter 3: Manipulating Objects
- Lesson: Selecting Objects in the Drawing
- Lesson: Changing an Object's Position
- Lesson: Creating New Objects from Existing Objects
- Lesson: Changing the Angle of an Object's Position
- Lesson: Creating a Mirror Image of Existing Objects
- Lesson: Creating Object Patterns
- Lesson: Changing an Object's Size
- Challenge Exercise: Grips
- Challenge Exercise: Architectural
- Challenge Exercise: Mechanical
- Chapter Summary
- Chapter 4: Drawing Organization and Inquiry Commands
- Chapter 5: Altering Objects
- Lesson: Trimming and Extending Objects to Defined Boundaries
- Lesson: Creating Parallel and Offset Geometry
- Lesson: Joining Objects
- Lesson: Breaking an Object into Two Objects
- Lesson: Applying a Radius Corner to Two Objects
- Lesson: Creating an Angled Corner Between Two Objects
- Lesson: Changing Part of an Object's Shape
- Challenge Exercise: Architectural
- Challenge Exercise: Mechanical
- Chapter Summary

68 ■ Chapter 2: Creating Basic Drawings
Practice Exercise: Line Command
In this practice exercise you will practice using the
Line command to draw the object below.
1.
Begin a new drawing.
2.
In the Select template dialog box, select the
acad template file (dwt) and click Open.
3.
Be sure the following status bar settings are
on:
■ Polar tracking
■ Object snap
■ Object snap tracking
4.
To draw the horizontal line:
■ On the ribbon, click Home tab > Draw
panel > Line.
■ For the start point (1), select a point on the
screen.
■ Drag the line to the right until you see that
the tooltip indicates the polar angle is 0.
■ Enter 4 and press ENTER.
5.
Continue with the Line command to draw the
remaining line segments from points (2) to (3):
■ Drag your mouse up until you see that the
tooltip indicates that the Polar angle is 90.
■ Enter 1 and press ENTER.
■ Drag to < 0, and enter 1 and press ENTER.
■ Drag to < 90, and enter 1.5 and press
ENTER.
■ Drag to < 180, and enter 1 and press
ENTER.
■ Drag to < 90, and enter 1 and press ENTER.
■ Drag to < 180, and enter 4 and press
ENTER.
6.
Drag the mouse down to Polar < 270 until you
see the that the object snap indicates you have
reached the original endpoint (1), and click the
endpoint. Be sure to click inside the Endpoint
Object Snap box. Press ENTER to end the Line
command.