
User`s guide
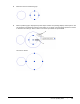
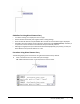
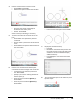
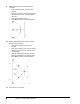
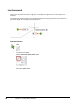
Table Of Contents
- Introduction
- Chapter 1: Taking the AutoCAD Tour
- Chapter 2: Creating Basic Drawings
- Chapter 3: Manipulating Objects
- Lesson: Selecting Objects in the Drawing
- Lesson: Changing an Object's Position
- Lesson: Creating New Objects from Existing Objects
- Lesson: Changing the Angle of an Object's Position
- Lesson: Creating a Mirror Image of Existing Objects
- Lesson: Creating Object Patterns
- Lesson: Changing an Object's Size
- Challenge Exercise: Grips
- Challenge Exercise: Architectural
- Challenge Exercise: Mechanical
- Chapter Summary
- Chapter 4: Drawing Organization and Inquiry Commands
- Chapter 5: Altering Objects
- Lesson: Trimming and Extending Objects to Defined Boundaries
- Lesson: Creating Parallel and Offset Geometry
- Lesson: Joining Objects
- Lesson: Breaking an Object into Two Objects
- Lesson: Applying a Radius Corner to Two Objects
- Lesson: Creating an Angled Corner Between Two Objects
- Lesson: Changing Part of an Object's Shape
- Challenge Exercise: Architectural
- Challenge Exercise: Mechanical
- Chapter Summary

64 ■ Chapter 2: Creating Basic Drawings
9.
Reveal geometric data using the dynamic
interface:
■ Click to select the first circle that you
created.
■ Place your crosshairs over, but do not click
the square grip box on the right edge of
the circle.
■ Verify that the circle radius is 1.
■ Press ESC to remove the circle selection.
10.
Reveal additional geometric data using the
Dynamic Input interface:
■ Click the two angular lines that you
created.
■ Place your crosshairs over, but do not click
the square grip box at the intersection of
the two lines.
■ Observe that both the length and angle
data are displayed for the selected lines.
■ Press ESC to remove the line selection.
11.
Close all files. Do not save.