
User`s guide

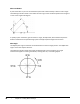

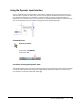
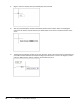
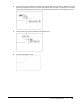
Table Of Contents
- Introduction
- Chapter 1: Taking the AutoCAD Tour
- Chapter 2: Creating Basic Drawings
- Chapter 3: Manipulating Objects
- Lesson: Selecting Objects in the Drawing
- Lesson: Changing an Object's Position
- Lesson: Creating New Objects from Existing Objects
- Lesson: Changing the Angle of an Object's Position
- Lesson: Creating a Mirror Image of Existing Objects
- Lesson: Creating Object Patterns
- Lesson: Changing an Object's Size
- Challenge Exercise: Grips
- Challenge Exercise: Architectural
- Challenge Exercise: Mechanical
- Chapter Summary
- Chapter 4: Drawing Organization and Inquiry Commands
- Chapter 5: Altering Objects
- Lesson: Trimming and Extending Objects to Defined Boundaries
- Lesson: Creating Parallel and Offset Geometry
- Lesson: Joining Objects
- Lesson: Breaking an Object into Two Objects
- Lesson: Applying a Radius Corner to Two Objects
- Lesson: Creating an Angled Corner Between Two Objects
- Lesson: Changing Part of an Object's Shape
- Challenge Exercise: Architectural
- Challenge Exercise: Mechanical
- Chapter Summary

54 ■ Chapter 2: Creating Basic Drawings
1.
Begin a command. The Dynamic Input field displays the command.
2.
After you press ENTER, the interface immediately switches to Point Input mode. The tooltip gives
instructions for what is required and the input fields reflect the current XY coordinate location of the
cursor.
3.
The Dynamic Input display prompts you for the next point. Enter a value in the Distance input field and
press TAB to lock the distance and activate the Angle input field. Enter a value in the Angle input field
and press TAB to lock the angle at 0 degrees. Click to select the point.