
User`s guide

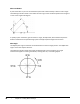
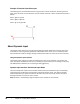

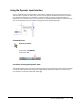
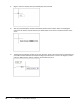
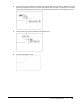
Table Of Contents
- Introduction
- Chapter 1: Taking the AutoCAD Tour
- Chapter 2: Creating Basic Drawings
- Chapter 3: Manipulating Objects
- Lesson: Selecting Objects in the Drawing
- Lesson: Changing an Object's Position
- Lesson: Creating New Objects from Existing Objects
- Lesson: Changing the Angle of an Object's Position
- Lesson: Creating a Mirror Image of Existing Objects
- Lesson: Creating Object Patterns
- Lesson: Changing an Object's Size
- Challenge Exercise: Grips
- Challenge Exercise: Architectural
- Challenge Exercise: Mechanical
- Chapter Summary
- Chapter 4: Drawing Organization and Inquiry Commands
- Chapter 5: Altering Objects
- Lesson: Trimming and Extending Objects to Defined Boundaries
- Lesson: Creating Parallel and Offset Geometry
- Lesson: Joining Objects
- Lesson: Breaking an Object into Two Objects
- Lesson: Applying a Radius Corner to Two Objects
- Lesson: Creating an Angled Corner Between Two Objects
- Lesson: Changing Part of an Object's Shape
- Challenge Exercise: Architectural
- Challenge Exercise: Mechanical
- Chapter Summary

Lesson: Inputting Data ■ 51
1. Tooltip: Displays instructions for the current step in the command and also reflects the current
prompt on the command line.
2. Coordinate, Length, or Angle input fields: Depending on the mode, these fields may vary in value
and position. In the image, one field represents the current length of the polyline while the other
represents the angle of the cursor. Enter a value to specify an explicit value. Press TAB to cycle
between the fields.
3. Down Arrow: Press DOWN ARROW (on the keyboard) to display the Dynamic Input menu. Press UP
ARROW to cycle through previously selected coordinates.
4. Dynamic Input Menu: Select an option for the command. Available options vary based on the
current context and reflect the options available on the command line.
Dynamic Input Interface—Pointer Input Mode
In the following illustration, the Dynamic Input interface has changed to Pointer Input mode because
the values @ 10 < 45 were entered on the keyboard. In Pointer Input mode, you can enter coordinate
information at the pointer as though your focus were on the command line. Use this mode for
absolute and relative coordinates. It is also the default mode for commands such as Move, Copy, and
Rotate.
Lock icons indicate a value that has been manually entered. To unlock a value, press TAB to enter the
input field, press DELETE to clear the value, then press TAB to exit the input field.
The default mode for dynamic input is for relative coordinates, but you can also enter absolute
coordinates. To do so, enter a pound sign before the first coordinate, for example, #2,20. If you enter
2,20 (without the # sign), the point will be relative to the last selected point. The dynamic input fields
adjust to reflect the entry format. In this case, the second field represents the Y coordinate.