
User`s guide
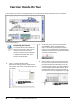
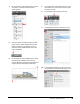


Table Of Contents
- Introduction
- Chapter 1: Taking the AutoCAD Tour
- Chapter 2: Creating Basic Drawings
- Chapter 3: Manipulating Objects
- Lesson: Selecting Objects in the Drawing
- Lesson: Changing an Object's Position
- Lesson: Creating New Objects from Existing Objects
- Lesson: Changing the Angle of an Object's Position
- Lesson: Creating a Mirror Image of Existing Objects
- Lesson: Creating Object Patterns
- Lesson: Changing an Object's Size
- Challenge Exercise: Grips
- Challenge Exercise: Architectural
- Challenge Exercise: Mechanical
- Chapter Summary
- Chapter 4: Drawing Organization and Inquiry Commands
- Chapter 5: Altering Objects
- Lesson: Trimming and Extending Objects to Defined Boundaries
- Lesson: Creating Parallel and Offset Geometry
- Lesson: Joining Objects
- Lesson: Breaking an Object into Two Objects
- Lesson: Applying a Radius Corner to Two Objects
- Lesson: Creating an Angled Corner Between Two Objects
- Lesson: Changing Part of an Object's Shape
- Challenge Exercise: Architectural
- Challenge Exercise: Mechanical
- Chapter Summary

40 ■ Chapter 1: Taking the AutoCAD Tour
Select the C_Hummer-Elevation drawing.
Notice that it is opened to the last view in
which it was saved.
11.
On the bottom right of the AutoCAD window,
click Layout to activate the color layout. Close
the drawing.
12.
Now you start a new drawing. On the Quick
Access toolbar, click New.
13.
In the Select Template dialog box, click the
arrow next to Open. Click Open with no
Template - Imperial. This opens a blank
drawing with basic settings that you can
change, such as the units format.
Note: For AutoCAD LT users, click acadlt.dwt.
14.
Move your cursor near the upper right corner
of your drawing area. Observe that the
coordinate readout shows a screen size of
about 12 x 9 units.
15.
Close all files. Do not save.