
User`s guide
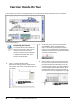
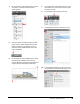


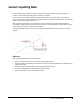

Table Of Contents
- Introduction
- Chapter 1: Taking the AutoCAD Tour
- Chapter 2: Creating Basic Drawings
- Chapter 3: Manipulating Objects
- Lesson: Selecting Objects in the Drawing
- Lesson: Changing an Object's Position
- Lesson: Creating New Objects from Existing Objects
- Lesson: Changing the Angle of an Object's Position
- Lesson: Creating a Mirror Image of Existing Objects
- Lesson: Creating Object Patterns
- Lesson: Changing an Object's Size
- Challenge Exercise: Grips
- Challenge Exercise: Architectural
- Challenge Exercise: Mechanical
- Chapter Summary
- Chapter 4: Drawing Organization and Inquiry Commands
- Chapter 5: Altering Objects
- Lesson: Trimming and Extending Objects to Defined Boundaries
- Lesson: Creating Parallel and Offset Geometry
- Lesson: Joining Objects
- Lesson: Breaking an Object into Two Objects
- Lesson: Applying a Radius Corner to Two Objects
- Lesson: Creating an Angled Corner Between Two Objects
- Lesson: Changing Part of an Object's Shape
- Challenge Exercise: Architectural
- Challenge Exercise: Mechanical
- Chapter Summary

Exercise: Hands-On Tour ■ 39
4.
On the View tab, click Navigate panel > Zoom
drop-down > Extents to view the entire
drawing layout.
5.
Now you switch the drawing view to model
space, which is where the geometry for the
drawing resides. On the status bar, at the
bottom of the AutoCAD window and to the
right, click Model.
6.
On the View tab, click Navigate panel > Zoom
drop-down list > Window. Click near the
points indicated in the following illustration to
magnify the area defined by the window.
7.
On the View tab, click Navigate panel > Zoom
drop-down list > Previous. This returns you to
the previous view.
8.
On the Quick Access toolbar, click Save.
9.
In the Application Menu, select File > Close.
10.
In the Application Menu, top right, you see a
list of previously opened files for quick access.