
User`s guide
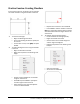


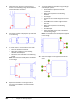
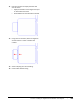


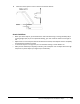
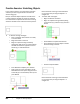
Table Of Contents
- Introduction
- Chapter 1: Taking the AutoCAD Tour
- Chapter 2: Creating Basic Drawings
- Chapter 3: Manipulating Objects
- Lesson: Selecting Objects in the Drawing
- Lesson: Changing an Object's Position
- Lesson: Creating New Objects from Existing Objects
- Lesson: Changing the Angle of an Object's Position
- Lesson: Creating a Mirror Image of Existing Objects
- Lesson: Creating Object Patterns
- Lesson: Changing an Object's Size
- Challenge Exercise: Grips
- Challenge Exercise: Architectural
- Challenge Exercise: Mechanical
- Chapter Summary
- Chapter 4: Drawing Organization and Inquiry Commands
- Chapter 5: Altering Objects
- Lesson: Trimming and Extending Objects to Defined Boundaries
- Lesson: Creating Parallel and Offset Geometry
- Lesson: Joining Objects
- Lesson: Breaking an Object into Two Objects
- Lesson: Applying a Radius Corner to Two Objects
- Lesson: Creating an Angled Corner Between Two Objects
- Lesson: Changing Part of an Object's Shape
- Challenge Exercise: Architectural
- Challenge Exercise: Mechanical
- Chapter Summary

Lesson: Changing Part of an Object's Shape ■ 425
4.
Select the second point or enter a value for the stretch distance.
Stretch Guidelines
■ When you stretch objects, you must define the stretch window using a crossing window (CW) or
crossing polygon (CP). If you use implied windowing, you must create the selection from right to
left.
■ Objects that are crossed by the selection window are stretched, while objects that are completely
enclosed by the window are moved.
■ To stretch an object in a straight line, be sure that Polar Tracking or Ortho Mode is on.
■ After you have selected your object(s) to Stretch, pick a basepoint near the object but far enough
away from any other objects you might snap to accidentally .