
User`s guide


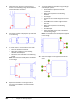
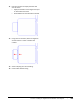

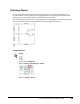

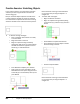
Table Of Contents
- Introduction
- Chapter 1: Taking the AutoCAD Tour
- Chapter 2: Creating Basic Drawings
- Chapter 3: Manipulating Objects
- Lesson: Selecting Objects in the Drawing
- Lesson: Changing an Object's Position
- Lesson: Creating New Objects from Existing Objects
- Lesson: Changing the Angle of an Object's Position
- Lesson: Creating a Mirror Image of Existing Objects
- Lesson: Creating Object Patterns
- Lesson: Changing an Object's Size
- Challenge Exercise: Grips
- Challenge Exercise: Architectural
- Challenge Exercise: Mechanical
- Chapter Summary
- Chapter 4: Drawing Organization and Inquiry Commands
- Chapter 5: Altering Objects
- Lesson: Trimming and Extending Objects to Defined Boundaries
- Lesson: Creating Parallel and Offset Geometry
- Lesson: Joining Objects
- Lesson: Breaking an Object into Two Objects
- Lesson: Applying a Radius Corner to Two Objects
- Lesson: Creating an Angled Corner Between Two Objects
- Lesson: Changing Part of an Object's Shape
- Challenge Exercise: Architectural
- Challenge Exercise: Mechanical
- Chapter Summary

420 ■ Chapter 5: Altering Objects
5.
Select the lines near their intersections as
shown in the following image. Press ENTER to
end the Chamfer command.
6.
Use Zoom and Pan to display the top-left view
in the drawing.
7.
To create more 1-unit chamfers in this view:
■ Start the Chamfer command.
■ Right-click anywhere in the drawing
window. Click Multiple.
■ Select the lines indicated in the following
image.
Note: The lines have already been chamfered
in this image.
8.
Repeat the chamfers on the right side of
the view. Press ENTER to end the Chamfer
command.
9.
To create additional chamfers using the Angle
and Multiple options:
■ Press ENTER to repeat the Chamfer
command.
■ Right-click anywhere in the drawing
window.
■ Click Angle.
■ Enter 1 for the chamfer length on the first
line.
■ Enter 60 for the chamfer angle from the
first line.
■ Right-click anywhere in the drawing
window.
■ Click Multiple.
■ Select the edges in the order indicated in
the following image.
Note: The chamfers have already been applied
in this image.
10.
Select the edges on the opposite side of the
view.