
User`s guide

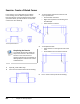
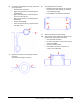
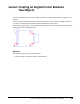
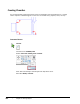
Table Of Contents
- Introduction
- Chapter 1: Taking the AutoCAD Tour
- Chapter 2: Creating Basic Drawings
- Chapter 3: Manipulating Objects
- Lesson: Selecting Objects in the Drawing
- Lesson: Changing an Object's Position
- Lesson: Creating New Objects from Existing Objects
- Lesson: Changing the Angle of an Object's Position
- Lesson: Creating a Mirror Image of Existing Objects
- Lesson: Creating Object Patterns
- Lesson: Changing an Object's Size
- Challenge Exercise: Grips
- Challenge Exercise: Architectural
- Challenge Exercise: Mechanical
- Chapter Summary
- Chapter 4: Drawing Organization and Inquiry Commands
- Chapter 5: Altering Objects
- Lesson: Trimming and Extending Objects to Defined Boundaries
- Lesson: Creating Parallel and Offset Geometry
- Lesson: Joining Objects
- Lesson: Breaking an Object into Two Objects
- Lesson: Applying a Radius Corner to Two Objects
- Lesson: Creating an Angled Corner Between Two Objects
- Lesson: Changing Part of an Object's Shape
- Challenge Exercise: Architectural
- Challenge Exercise: Mechanical
- Chapter Summary

416 ■ Chapter 5: Altering Objects
■ Using the Trim and No Trim modes, you can trim or extend chamfered objects to the chamfer line
or retain the chamfered objects as they were before the chamfer, as shown next.
■ You can chamfer all corners of a polyline using the Polyline option.
■ The Multiple option allows you to chamfer more than one set of objects without leaving the
command. For example, you could chamfer the four corners of the square shown next with one
Chamfer command.
Procedure: Creating Chamfers
The following steps give an overview of creating chamfers with the Chamfer command.
1.
Start the Chamfer command.
2.
Confirm the settings on the command line. If necessary, adjust the options as required for the design
intent.
Command: _chamfer(NOTRIM mode) Current chamfer Dist1 = 1.0000, Dist2 = 1.5000Select first line or
[Undo/Polyline/Distance/Angle/Trim/mEthod/Multiple]:
3.
Select the first object to be chamfered.
4.
Select the second object to be chamfered.
The chamfer feature is created.
Note: If you choose the Polyline option, step 4 is not required, as all vertices of the polyline will be
filleted at once.
Chamfer Guidelines
■ If both objects being chamfered are on the same layer, the chamfer line is created on that layer.
Otherwise, the chamfer line is created on the current layer.
■ Entering chamfer distances of 0 creates a sharp corner.
■ Setting equal chamfer distances is the same as setting the angle at 45 degrees.
■ When setting chamfer distances the first distance is always applied to the first line you pick.
■ Chamfering a line to a polyline will automatically join it to the polyline.
■ A closed polyline will chamfer in a counter-clockwise direction.
■ Hold down the SHIFT key while selecting the object to override the chamfer distance values and
create a sharp corner.