
User`s guide
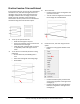

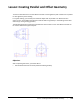
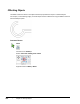

Table Of Contents
- Introduction
- Chapter 1: Taking the AutoCAD Tour
- Chapter 2: Creating Basic Drawings
- Chapter 3: Manipulating Objects
- Lesson: Selecting Objects in the Drawing
- Lesson: Changing an Object's Position
- Lesson: Creating New Objects from Existing Objects
- Lesson: Changing the Angle of an Object's Position
- Lesson: Creating a Mirror Image of Existing Objects
- Lesson: Creating Object Patterns
- Lesson: Changing an Object's Size
- Challenge Exercise: Grips
- Challenge Exercise: Architectural
- Challenge Exercise: Mechanical
- Chapter Summary
- Chapter 4: Drawing Organization and Inquiry Commands
- Chapter 5: Altering Objects
- Lesson: Trimming and Extending Objects to Defined Boundaries
- Lesson: Creating Parallel and Offset Geometry
- Lesson: Joining Objects
- Lesson: Breaking an Object into Two Objects
- Lesson: Applying a Radius Corner to Two Objects
- Lesson: Creating an Angled Corner Between Two Objects
- Lesson: Changing Part of an Object's Shape
- Challenge Exercise: Architectural
- Challenge Exercise: Mechanical
- Chapter Summary

Lesson: Creating Parallel and Offset Geometry ■ 373
Lesson: Creating Parallel and Offset Geometry
This lesson describes how to use the Offset command to create geometry that is offset from or parallel
to other geometry in the drawing.
In a typical drawing, you are likely to find several objects that are parallel to or offset from each
other. You can use the Offset command to create this effect on geometry in the drawing and increase
efficiency by reusing existing geometry.
The following illustration shows several parallel lines and concentric circles. The Offset command can
be used to create these types of objects.
Objectives
After completing this lesson, you will be able to:
■ Use the Offset command to create parallel and offset geometry.