
User`s guide
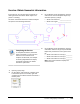
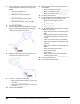
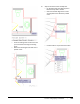
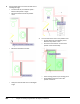


Table Of Contents
- Introduction
- Chapter 1: Taking the AutoCAD Tour
- Chapter 2: Creating Basic Drawings
- Chapter 3: Manipulating Objects
- Lesson: Selecting Objects in the Drawing
- Lesson: Changing an Object's Position
- Lesson: Creating New Objects from Existing Objects
- Lesson: Changing the Angle of an Object's Position
- Lesson: Creating a Mirror Image of Existing Objects
- Lesson: Creating Object Patterns
- Lesson: Changing an Object's Size
- Challenge Exercise: Grips
- Challenge Exercise: Architectural
- Challenge Exercise: Mechanical
- Chapter Summary
- Chapter 4: Drawing Organization and Inquiry Commands
- Chapter 5: Altering Objects
- Lesson: Trimming and Extending Objects to Defined Boundaries
- Lesson: Creating Parallel and Offset Geometry
- Lesson: Joining Objects
- Lesson: Breaking an Object into Two Objects
- Lesson: Applying a Radius Corner to Two Objects
- Lesson: Creating an Angled Corner Between Two Objects
- Lesson: Changing Part of an Object's Shape
- Challenge Exercise: Architectural
- Challenge Exercise: Mechanical
- Chapter Summary

352 ■ Chapter 4: Drawing Organization and Inquiry Commands
6.
Use the angle option to ensure the walls are at
a 90 degree angle.
■ On the Home tab, click Utilities panel >
Measure drop-down > Angle.
■ Select the bottom wall of the powder
room.
■ Select the wall behind the sink.
■ Verify that the two walls are at a 90 degree
angle.
7.
Find the area of the floor in the powder room.
■ On the Home tab, click Utilities panel >
Measure drop-down > Area.
■ Click each of the interior corners of the
powder room consecutively.
■ Finish clicking points at your starting point.
■ Press ENTER to view the area of the
powder room floor.