
User`s guide
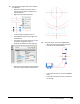


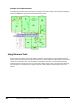

Table Of Contents
- Introduction
- Chapter 1: Taking the AutoCAD Tour
- Chapter 2: Creating Basic Drawings
- Chapter 3: Manipulating Objects
- Lesson: Selecting Objects in the Drawing
- Lesson: Changing an Object's Position
- Lesson: Creating New Objects from Existing Objects
- Lesson: Changing the Angle of an Object's Position
- Lesson: Creating a Mirror Image of Existing Objects
- Lesson: Creating Object Patterns
- Lesson: Changing an Object's Size
- Challenge Exercise: Grips
- Challenge Exercise: Architectural
- Challenge Exercise: Mechanical
- Chapter Summary
- Chapter 4: Drawing Organization and Inquiry Commands
- Chapter 5: Altering Objects
- Lesson: Trimming and Extending Objects to Defined Boundaries
- Lesson: Creating Parallel and Offset Geometry
- Lesson: Joining Objects
- Lesson: Breaking an Object into Two Objects
- Lesson: Applying a Radius Corner to Two Objects
- Lesson: Creating an Angled Corner Between Two Objects
- Lesson: Changing Part of an Object's Shape
- Challenge Exercise: Architectural
- Challenge Exercise: Mechanical
- Chapter Summary

328 ■ Chapter 4: Drawing Organization and Inquiry Commands
■ Drag the copied objects to the right. Click
the intersection point of the centerline and
bottom line in that view.
■ Press ENTER to complete the Copy
command.
10.
To change the linetypes and modify the copied
lines:
■ With the command line blank, select the
lines that you just copied.
■ Click the lower grip in the line segment
on the left. Drag it perpendicular to the
horizontal line as indicated.
■ With the objects still selected, on the
Home tab, click Layer Control list > Hidden.
■ Press ESC to deselect all lines.
The previously selected lines should all be on
the HIDDEN layer.
■ With the command line blank, select the
upper hidden horizontal line.
■ Select the endpoint on the right and drag it
to the endpoint object snap of the vertical
hidden line as indicated below. Use the
intersection or perpendicular object snap
mode.
■ Repeat this for the opposite endpoint.