
User`s guide
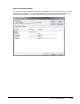
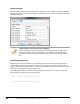

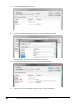
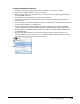
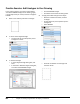
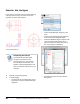
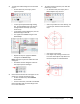
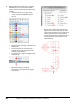
Table Of Contents
- Introduction
- Chapter 1: Taking the AutoCAD Tour
- Chapter 2: Creating Basic Drawings
- Chapter 3: Manipulating Objects
- Lesson: Selecting Objects in the Drawing
- Lesson: Changing an Object's Position
- Lesson: Creating New Objects from Existing Objects
- Lesson: Changing the Angle of an Object's Position
- Lesson: Creating a Mirror Image of Existing Objects
- Lesson: Creating Object Patterns
- Lesson: Changing an Object's Size
- Challenge Exercise: Grips
- Challenge Exercise: Architectural
- Challenge Exercise: Mechanical
- Chapter Summary
- Chapter 4: Drawing Organization and Inquiry Commands
- Chapter 5: Altering Objects
- Lesson: Trimming and Extending Objects to Defined Boundaries
- Lesson: Creating Parallel and Offset Geometry
- Lesson: Joining Objects
- Lesson: Breaking an Object into Two Objects
- Lesson: Applying a Radius Corner to Two Objects
- Lesson: Creating an Angled Corner Between Two Objects
- Lesson: Changing Part of an Object's Shape
- Challenge Exercise: Architectural
- Challenge Exercise: Mechanical
- Chapter Summary

326 ■ Chapter 4: Drawing Organization and Inquiry Commands
6.
Before drawing the hidden lines, make the
HIDDEN layer current. Freeze the HATCH
layer and select the appropriate object snap
settings:
■ On the Home tab, click Layers panel
> Layer list. Select HIDDEN to make it
current.
■ Select the Layer List again and Freeze the
HATCH layer.
■ On the status bar, be sure that polar
tracking, object snap, and object snap
tracking are all selected.
■ On the status bar, right-click Object Snap.
Click Settings.
■ Select the Endpoint, Quadrant,
Intersection, and Perpendicular object
snap modes.
■ Use the Line command to draw two line
segments in the front view that track the
right and left quadrants of the small circles
in the top view. Draw the line segments
so that they intersect the slanted line and
are perpendicular to the bottom line as
indicated below.