
User`s guide
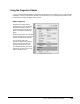
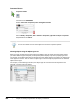
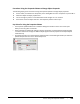

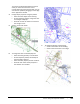
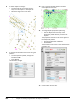

Table Of Contents
- Introduction
- Chapter 1: Taking the AutoCAD Tour
- Chapter 2: Creating Basic Drawings
- Chapter 3: Manipulating Objects
- Lesson: Selecting Objects in the Drawing
- Lesson: Changing an Object's Position
- Lesson: Creating New Objects from Existing Objects
- Lesson: Changing the Angle of an Object's Position
- Lesson: Creating a Mirror Image of Existing Objects
- Lesson: Creating Object Patterns
- Lesson: Changing an Object's Size
- Challenge Exercise: Grips
- Challenge Exercise: Architectural
- Challenge Exercise: Mechanical
- Chapter Summary
- Chapter 4: Drawing Organization and Inquiry Commands
- Chapter 5: Altering Objects
- Lesson: Trimming and Extending Objects to Defined Boundaries
- Lesson: Creating Parallel and Offset Geometry
- Lesson: Joining Objects
- Lesson: Breaking an Object into Two Objects
- Lesson: Applying a Radius Corner to Two Objects
- Lesson: Creating an Angled Corner Between Two Objects
- Lesson: Changing Part of an Object's Shape
- Challenge Exercise: Architectural
- Challenge Exercise: Mechanical
- Chapter Summary

Lesson: Using the Properties Palette ■ 311
This causes the Properties palette to expand
when you move the mouse over it and
contract when the mouse moves away. You can
also dock the palette by dragging it to the edge
of the application window.
4.
Change object properties using the palette:
■ Select all of the objects in the drawing.
■ On the Properties palette, change the color
and linetype to ByLayer.
■ Press ESC to clear the selection and notice
the change in color.
5.
Zoom in to the area shown.
6.
To change the color of selected polylines:
■ Select all of the geometry in the window.
■ On the Properties palette, select Polyline
from the Object Type list.
■ Select the Color property and set it to Blue.
■ Press ESC and notice that all polylines in
the selection are now blue.
7.
To change the display of the drawing:
■ Zoom to the extents of the drawing.
■ Zoom to the area shown in the image.