
User`s guide
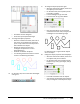
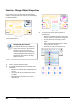
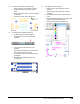

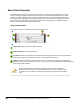
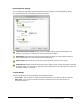
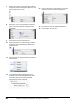
Table Of Contents
- Introduction
- Chapter 1: Taking the AutoCAD Tour
- Chapter 2: Creating Basic Drawings
- Chapter 3: Manipulating Objects
- Lesson: Selecting Objects in the Drawing
- Lesson: Changing an Object's Position
- Lesson: Creating New Objects from Existing Objects
- Lesson: Changing the Angle of an Object's Position
- Lesson: Creating a Mirror Image of Existing Objects
- Lesson: Creating Object Patterns
- Lesson: Changing an Object's Size
- Challenge Exercise: Grips
- Challenge Exercise: Architectural
- Challenge Exercise: Mechanical
- Chapter Summary
- Chapter 4: Drawing Organization and Inquiry Commands
- Chapter 5: Altering Objects
- Lesson: Trimming and Extending Objects to Defined Boundaries
- Lesson: Creating Parallel and Offset Geometry
- Lesson: Joining Objects
- Lesson: Breaking an Object into Two Objects
- Lesson: Applying a Radius Corner to Two Objects
- Lesson: Creating an Angled Corner Between Two Objects
- Lesson: Changing Part of an Object's Shape
- Challenge Exercise: Architectural
- Challenge Exercise: Mechanical
- Chapter Summary

Lesson: Quick Properties ■ 295
Exercise: Use Quick Properties
In this exercise, you use the Quick Properties
palette to view various object properties. You also
customize the Quick Properties palette to control the
circumstances in which the palette appears and the
options it displays.
The completed exercise
Completing the Exercise
To complete the exercise, follow the
steps in this book or in the onscreen
exercise. In the onscreen list of
chapters and exercises, click Chapter
4: Drawing Organization and Inquiry
Commands. Click Exercise: Use Quick
Properties.
1.
Open c_quick properties.dwg.
2.
On the status bar, right-click Quick Properties.
Click Settings.
3.
In the Drafting Settings dialog box, Quick
Properties tab:
■ Place a check mark in the box next to the
Enable Quick Properties Palette option.
■ For the Palette Display, click All Objects.
4.
Under Palette Location:
■ Click Cursor-dependent.
■ For Quadrant, select Bottom-Right.
■ For Distance in Pixels, enter 20.
5.
Under Palette Behavior:
■ Verify that Collapse Palette Automatically is
selected.
■ For the minimum number of rows, enter 2.
6.
Click OK.