
User`s guide
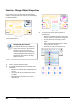
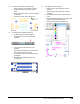

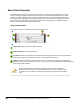
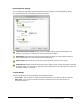
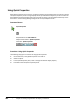
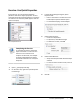
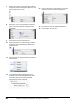
Table Of Contents
- Introduction
- Chapter 1: Taking the AutoCAD Tour
- Chapter 2: Creating Basic Drawings
- Chapter 3: Manipulating Objects
- Lesson: Selecting Objects in the Drawing
- Lesson: Changing an Object's Position
- Lesson: Creating New Objects from Existing Objects
- Lesson: Changing the Angle of an Object's Position
- Lesson: Creating a Mirror Image of Existing Objects
- Lesson: Creating Object Patterns
- Lesson: Changing an Object's Size
- Challenge Exercise: Grips
- Challenge Exercise: Architectural
- Challenge Exercise: Mechanical
- Chapter Summary
- Chapter 4: Drawing Organization and Inquiry Commands
- Chapter 5: Altering Objects
- Lesson: Trimming and Extending Objects to Defined Boundaries
- Lesson: Creating Parallel and Offset Geometry
- Lesson: Joining Objects
- Lesson: Breaking an Object into Two Objects
- Lesson: Applying a Radius Corner to Two Objects
- Lesson: Creating an Angled Corner Between Two Objects
- Lesson: Changing Part of an Object's Shape
- Challenge Exercise: Architectural
- Challenge Exercise: Mechanical
- Chapter Summary

Lesson: Changing Object Properties ■ 289
4.
To move some tables to another layer:
■ Select the three round tables as shown.
■ On the Home tab, click Layers panel >
Layer.
■ Click the furniture layer to move the tables
to this layer.
■ Press ESC to clear your selection set.
5.
To change the lineweight of objects:
■ On the status bar, click Show/Hide
Lineweight to turn on the lineweight
visibility.
■ Zoom into the stairwell area on the
drawing.
■ Select the inside walls of the stairwell, all
stair treads, and the door lines.
■ On the Home tab, click Properties panel >
Lineweight.
■ Click ByLayer. Press ESC to clear your
selection set.
6.
To change the color of objects:
■ Zoom into the upper right part of your
drawing.
■ Select the lines of the counter space as
indicated.
■ On the Home tab, click Properties panel >
Color.
■ Select the ByLayer property to change each
object's color to that of its layer.
■ Press ESC to clear your selection set.