
User`s guide
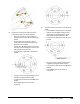
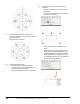
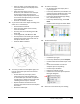
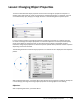
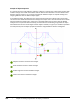
Table Of Contents
- Introduction
- Chapter 1: Taking the AutoCAD Tour
- Chapter 2: Creating Basic Drawings
- Chapter 3: Manipulating Objects
- Lesson: Selecting Objects in the Drawing
- Lesson: Changing an Object's Position
- Lesson: Creating New Objects from Existing Objects
- Lesson: Changing the Angle of an Object's Position
- Lesson: Creating a Mirror Image of Existing Objects
- Lesson: Creating Object Patterns
- Lesson: Changing an Object's Size
- Challenge Exercise: Grips
- Challenge Exercise: Architectural
- Challenge Exercise: Mechanical
- Chapter Summary
- Chapter 4: Drawing Organization and Inquiry Commands
- Chapter 5: Altering Objects
- Lesson: Trimming and Extending Objects to Defined Boundaries
- Lesson: Creating Parallel and Offset Geometry
- Lesson: Joining Objects
- Lesson: Breaking an Object into Two Objects
- Lesson: Applying a Radius Corner to Two Objects
- Lesson: Creating an Angled Corner Between Two Objects
- Lesson: Changing Part of an Object's Shape
- Challenge Exercise: Architectural
- Challenge Exercise: Mechanical
- Chapter Summary

Lesson: Using Layers ■ 271
■ Select an object on the Visible layer and
notice how the layer name displays in the
Layer Control list.
■ Select any other object, such as a
dimension, and notice that now the Layer
Control field is blank. Because the list
cannot display multiple properties at once,
this indicates the objects that you selected
are on different layers.
■ Press ESC to deselect all objects.
10.
Try to move some of the objects including ones
which are on a locked layer:
■ Start the Move command.
■ Select all of the objects in the auxiliary
view. Press ENTER.
■ Click any point on the drawing. Enter 25.
Press TAB.
■ In the Angle field, enter 30. Press TAB.
■ Click anywhere in the drawing to complete
the Move command. Notice that some of
the objects did not move.
■ Undo the Move command.
11.
This time you will move the objects again, but
first you unlock the layer that some of these
objects are on:
■ On the Home tab, click Layers panel >
Layer Control list. Click the padlock icon
on the Visible layer. Note that the padlock
changes from a closed lock to an open lock
indicating that the layer is unlocked.
■ Repeat the Move command from the
previous step. Notice how all of the objects
are moved.
■ Relock the visible layer.
12.
To create a new layer:
■ On the Home tab, click Layers panel >
Layer Properties.
■ In the Layer Name field, click Visible. The
properties of layer Visible are used as the
default properties for the new layer.
■ In the Layer Properties Manager dialog
box, click New Layer (1).
■ In the Layer Name field (2), enter Title
Block.
■ Click the Color field (3) and select White.
13.
To add another layer:
■ Click New Layer again.
■ In the Layer Name field, enter Viewport.
■ Click the Color field and select Cyan. Click
OK.
■ Click in the Plot field. This sets the
Viewport layer to nonplotting.
■ Click the layer Title Block.
■ Right-click. Click Set Current.
■ Click the X to close the Layer Properties
Manager dialog box.
14.
Zoom out to the extents of your drawing.